One of Unraid’s biggest advantages over traditional RAID is flexibility. You can upgrade parity, add drives, and reclaim old hardware without rebuilding the array from scratch or touching your data. This guide walks through a real-world upgrade scenario from start to finish.
Executive Summary#
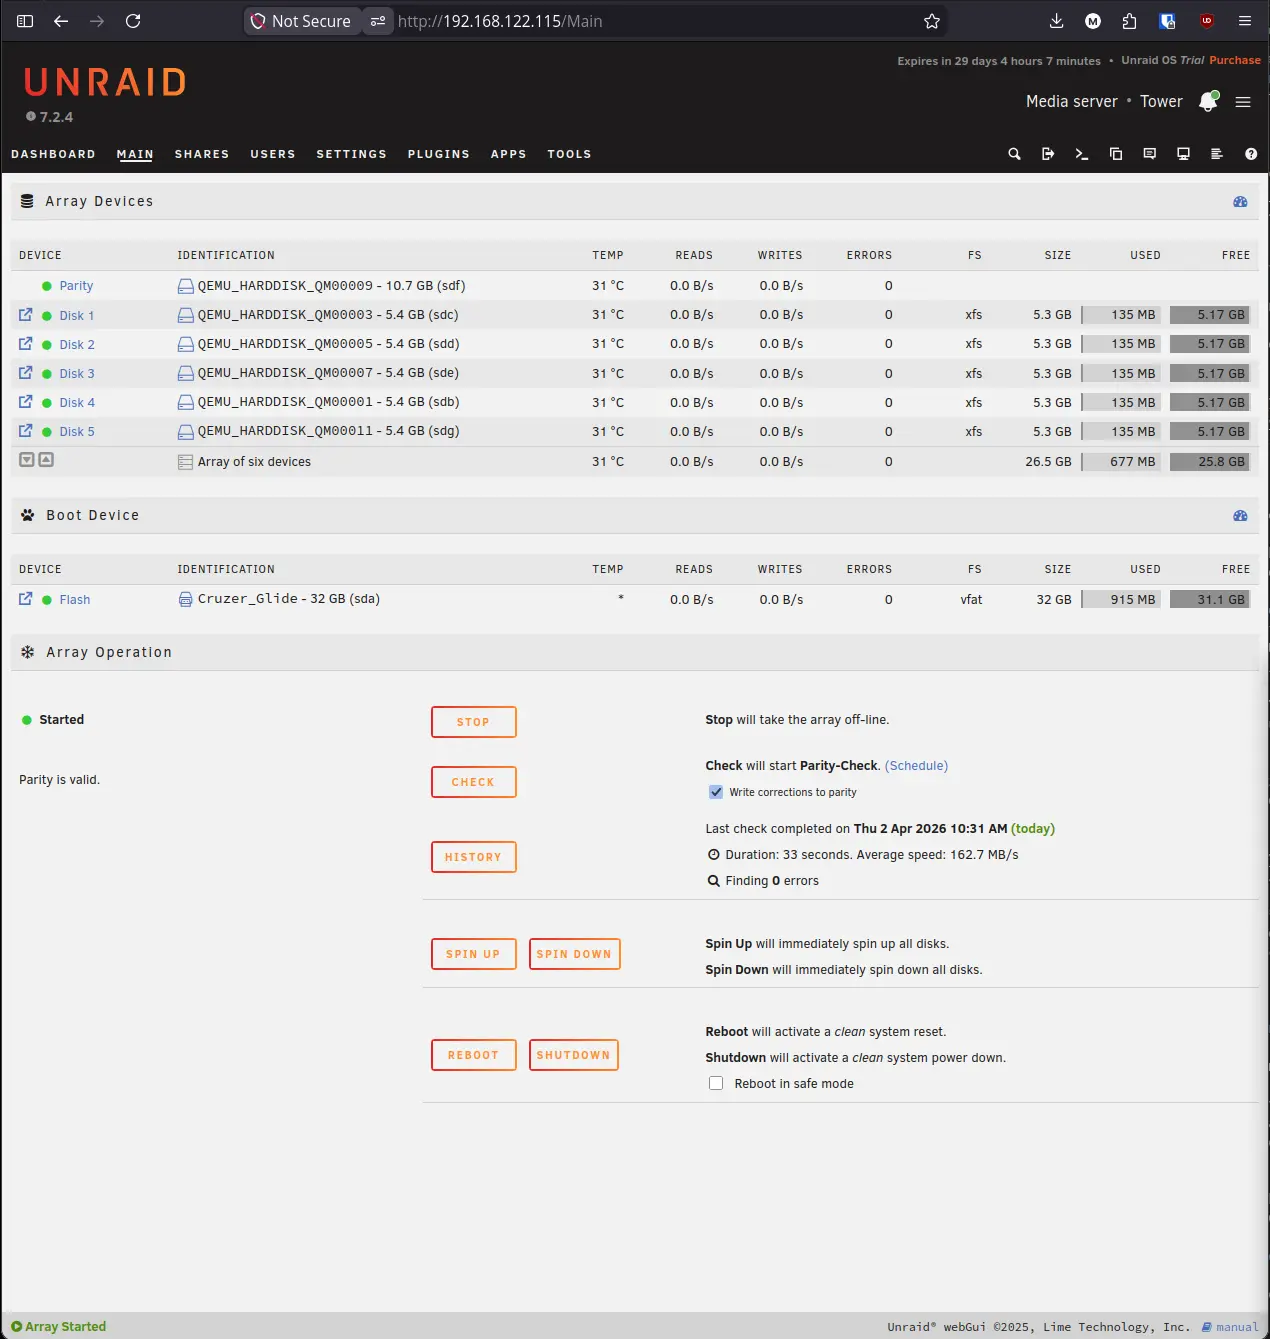
Starting with a 5GB parity drive and three 5GB data drives, we will upgrade parity to a 10GB drive, reclaim the old parity drive as a data drive, and add a brand new 5GB data drive to the array. By the end we will have a 10GB parity drive protecting five 5GB data drives.
Prerequisites#
| Component | Requirement |
|---|---|
| Unraid Server | A running server with a started and parity-protected array |
| New Drives | Physically installed and visible in Unraid’s Unassigned Devices section |
Assumptions: This guide follows on from Installing and Configuring Unraid. Your array should already be started with at least one parity drive and one or more data drives before continuing.
Implementation#
Step 1: Confirm New Drives Are Detected#
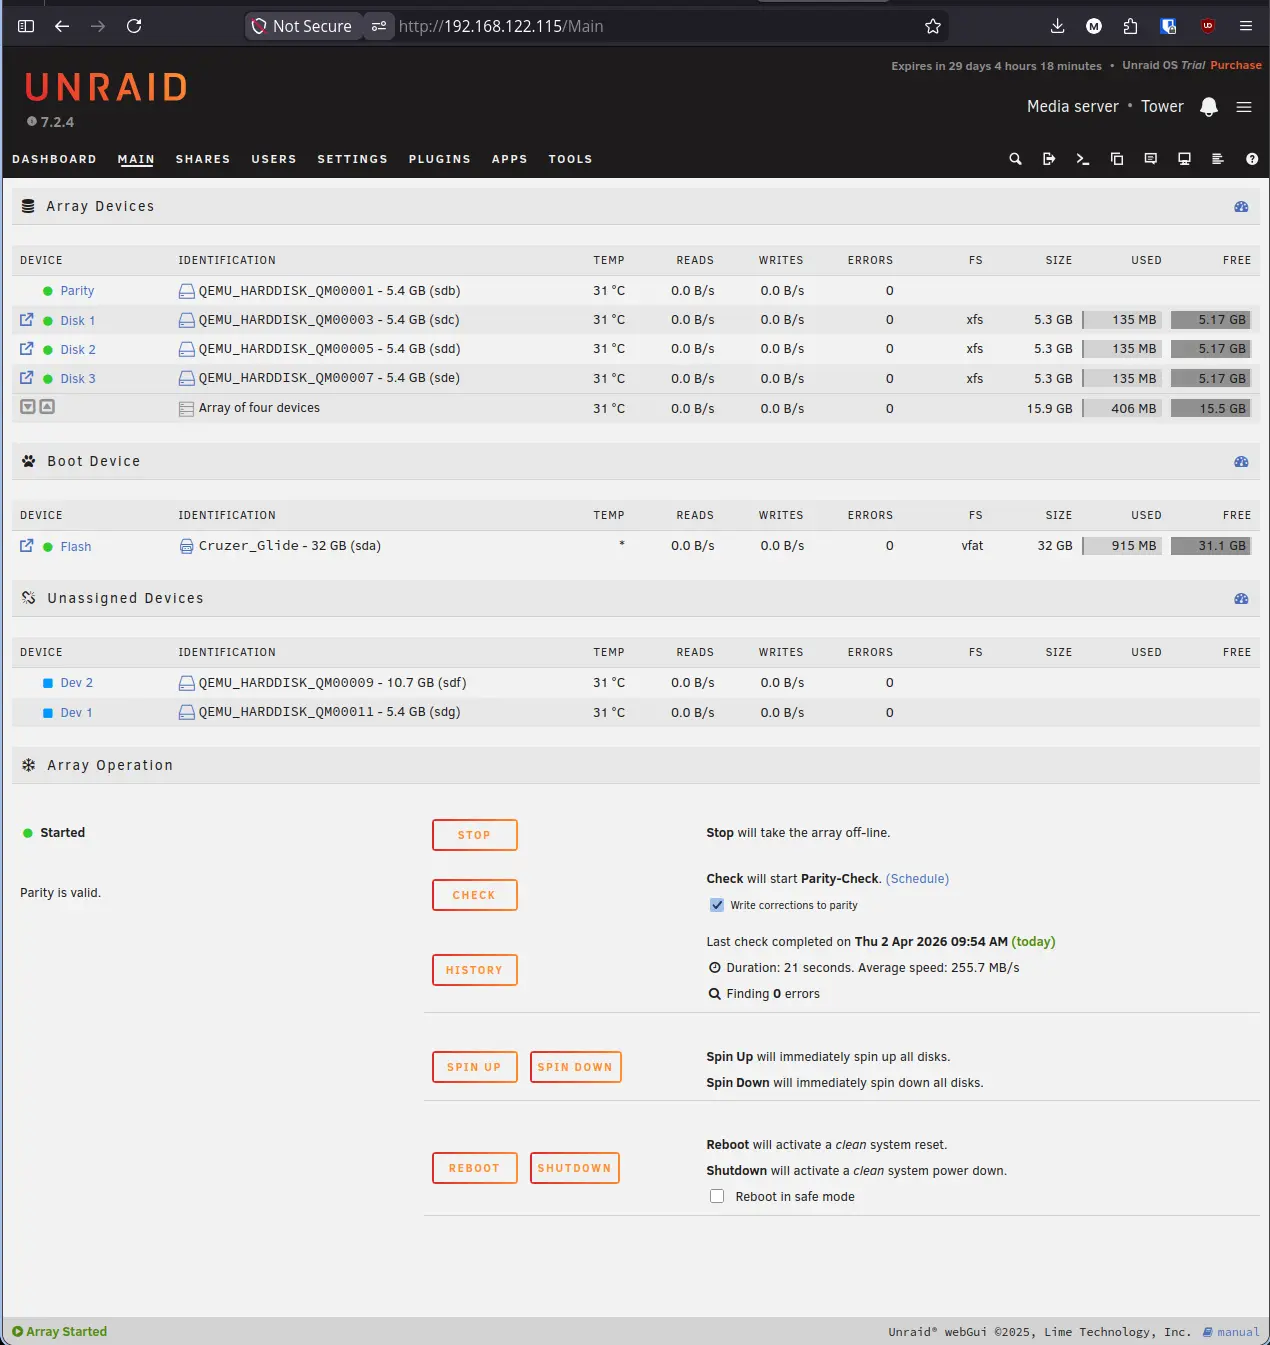
Before making any changes, confirm that Unraid can see your new drives and that your array is healthy.
- Click the Main tab in the top navigation bar.
- Scroll down to the Unassigned Devices section. Your new drives should appear here with their size and model listed.
- Confirm the Array Operation section at the bottom shows Parity is valid. Never make drive assignment changes on a degraded array.
Step 2: Run a SMART Test on the New Drives#
Before adding any drive to the array, run a SMART test on it. SMART (Self-Monitoring, Analysis, and Reporting Technology) is a built-in health monitoring system that every modern hard drive uses to track its own condition. Running a test before adding a drive catches problems before your data depends on it.
- In the Unassigned Devices section, click on the name of your new drive to open its details page.
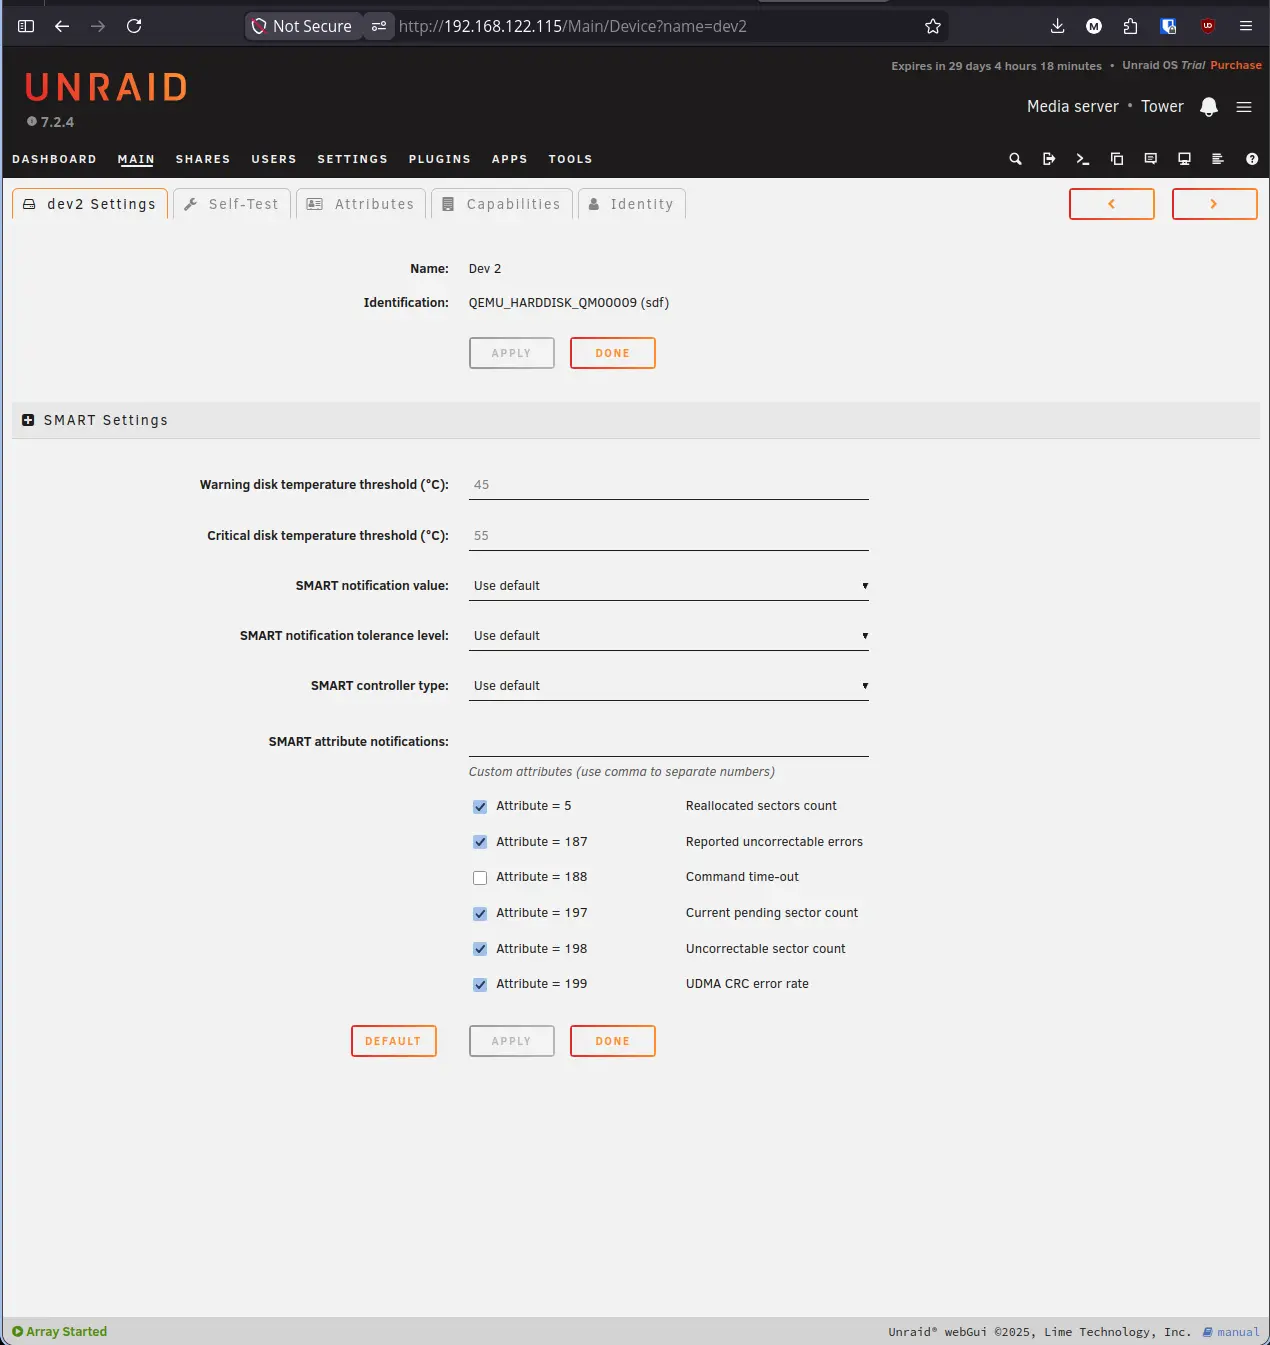
- Click the Self-Test tab at the top of the page.
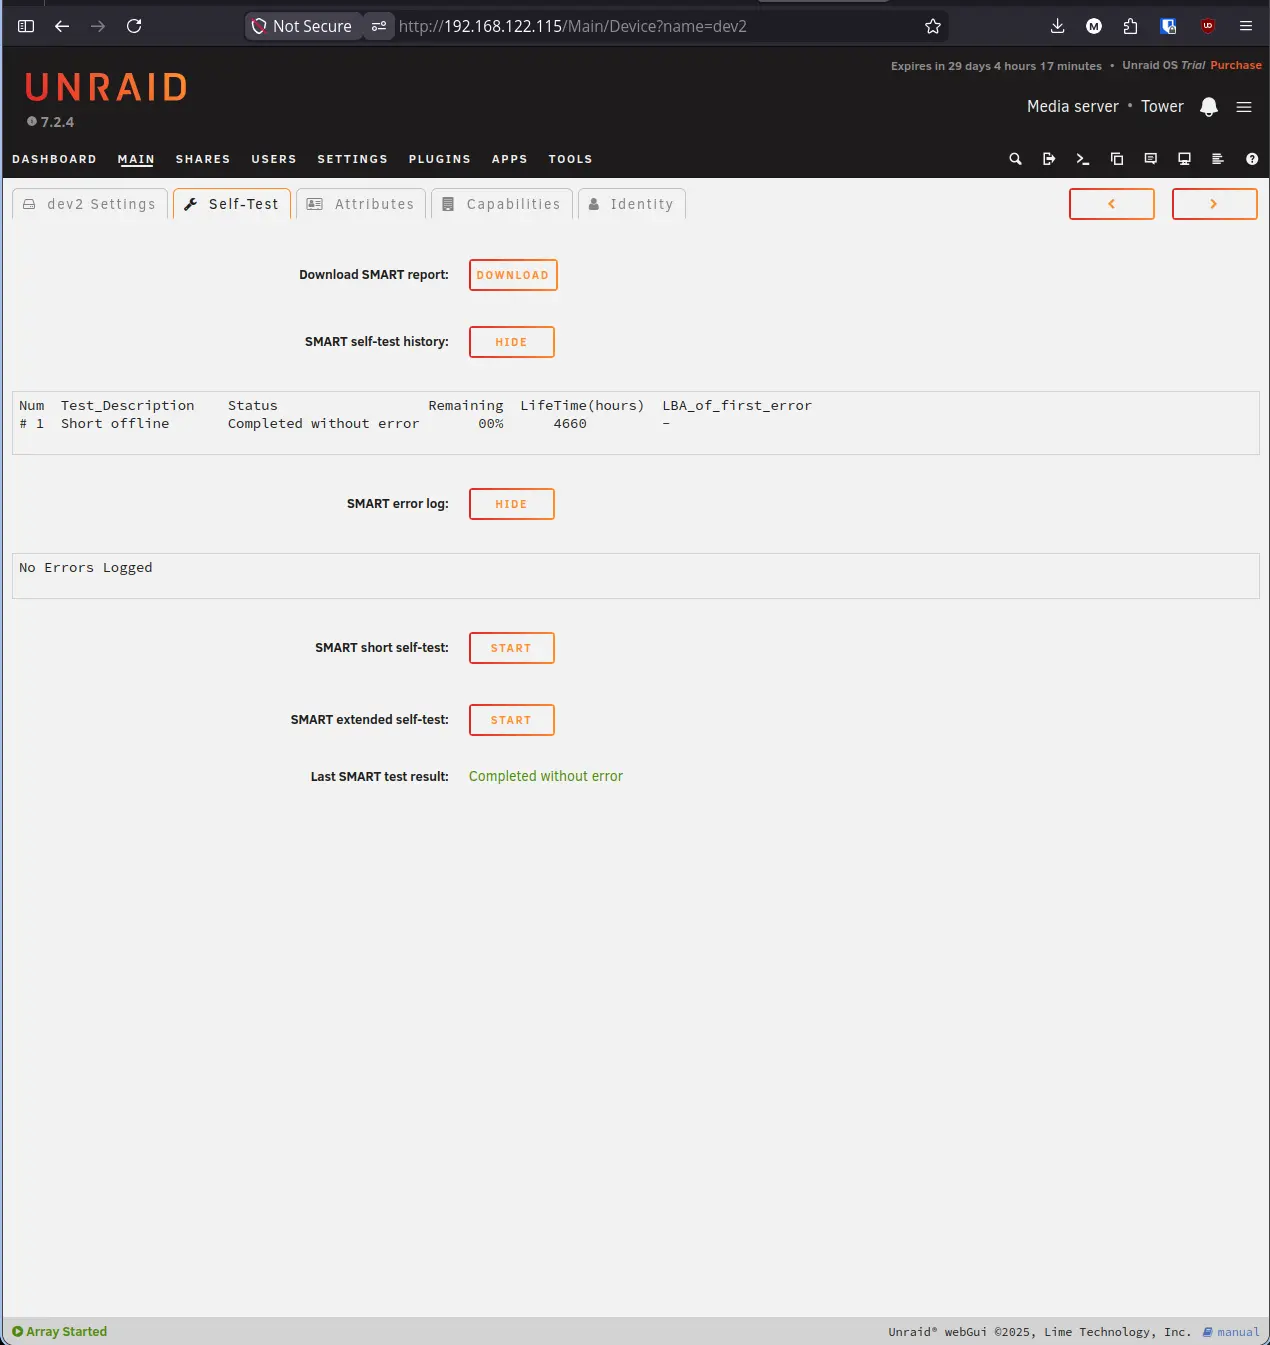
- Click Start next to SMART short self-test and wait for it to complete. A short test takes 2 to 5 minutes and catches most common drive problems.
- Confirm the Last SMART test result shows Completed without error.
- Repeat for the second new drive.
Note: A SMART extended self-test is more thorough but can take several hours on larger drives. For new drives, run the short test first and the extended test overnight before trusting the drive with important data.
Step 3: Upgrade Parity to the Larger Drive#
Unraid requires that the parity drive is always equal to or larger than the biggest data drive in the array. Since our new 10GB drive is larger than the existing 5GB parity, we need to promote it to parity before we can do anything else.
- Click the Main tab and scroll to the Array Operation section at the bottom.
- Click Stop.
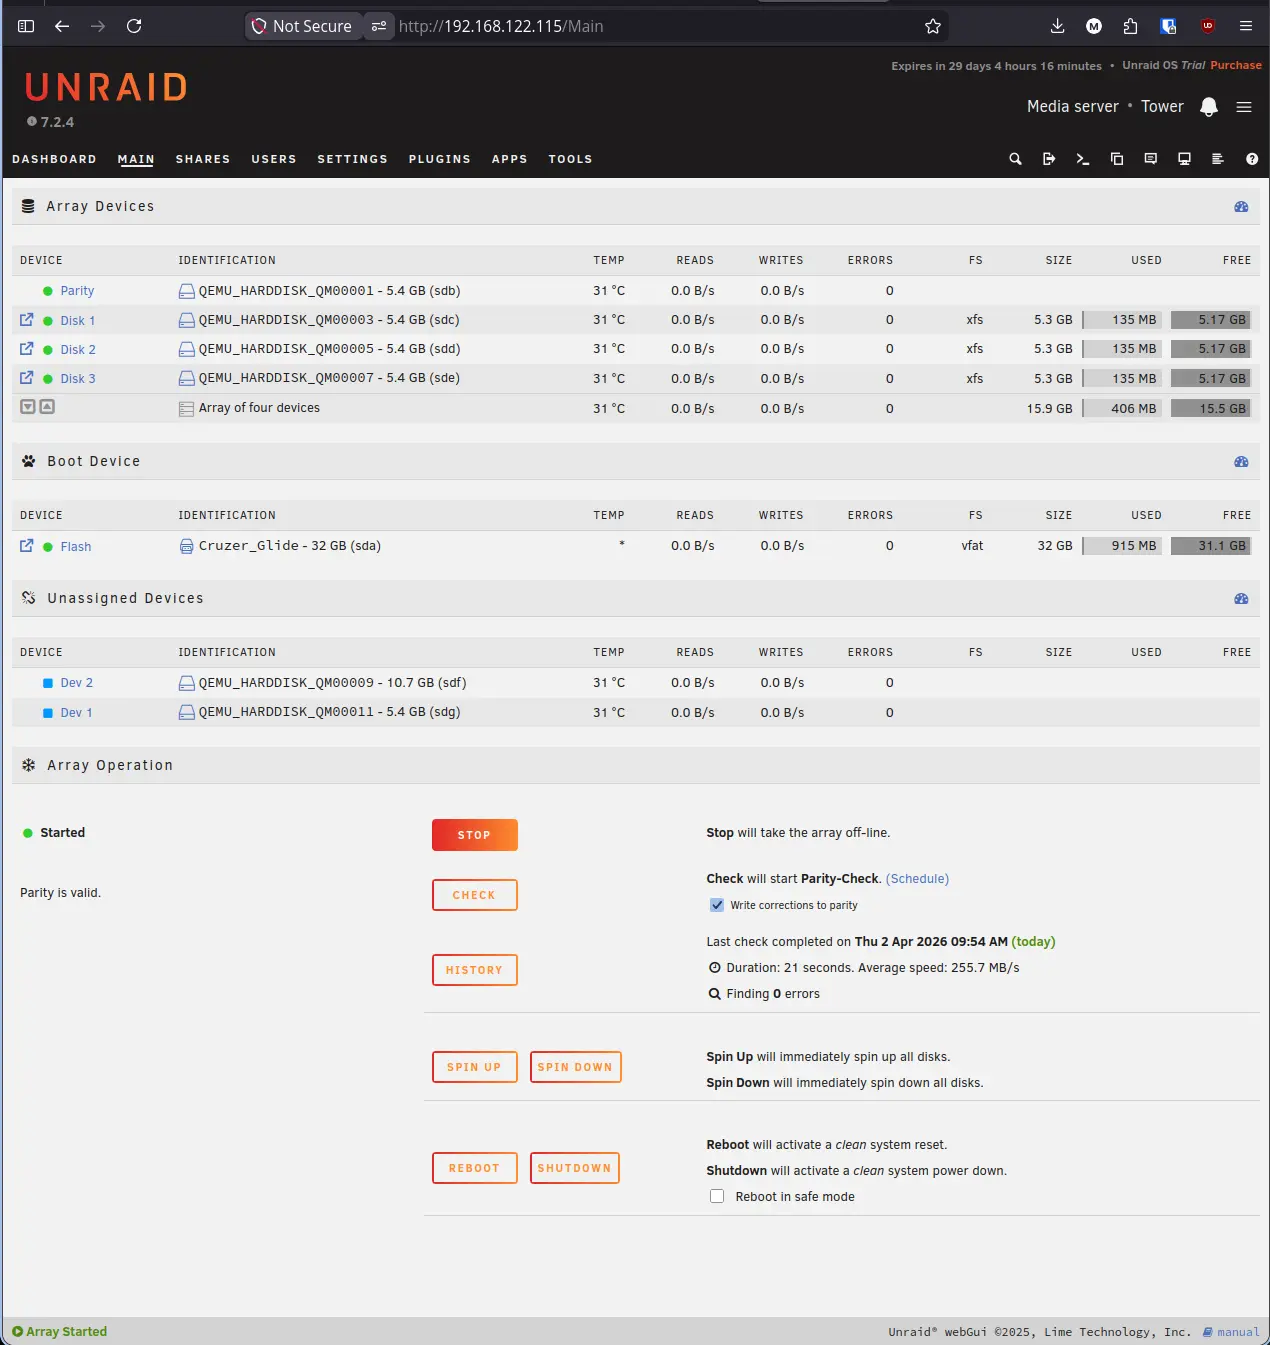
- Unraid will ask you to confirm. Click Proceed.
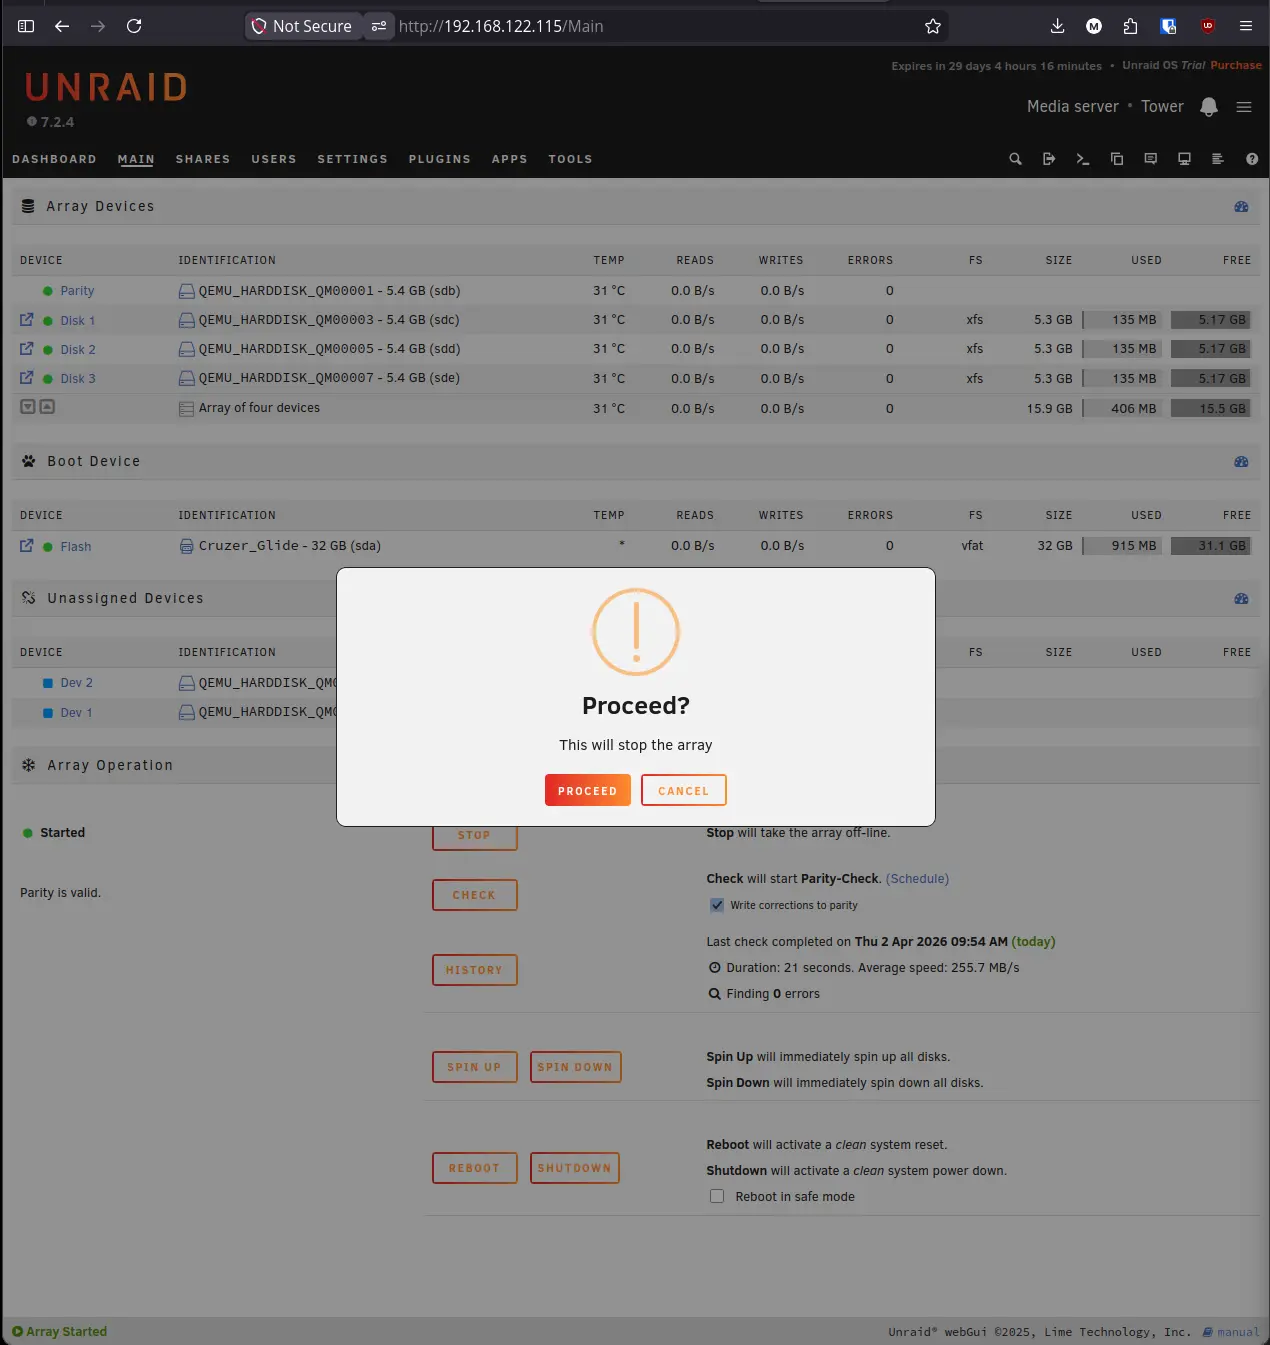
- Once the array is stopped, click the Parity slot dropdown and select the 10.7GB drive.
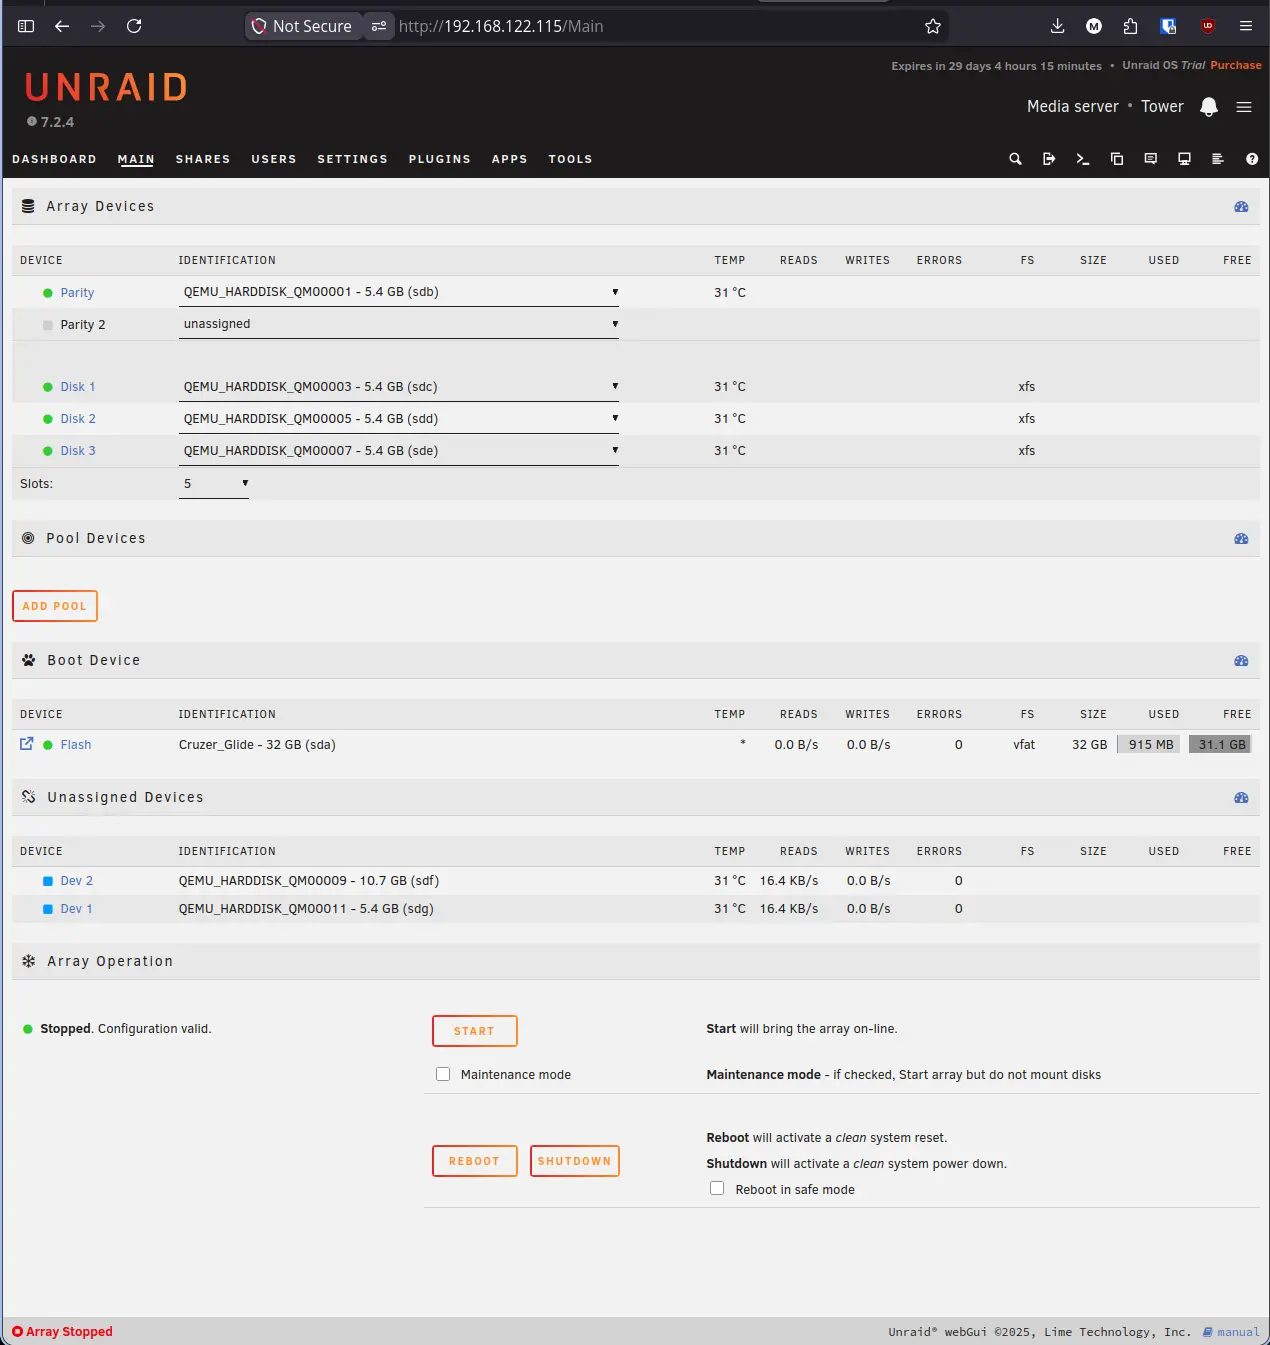
- Unraid will warn you that all existing data on the new drive will be overwritten. This is expected as the drive needs to be written with new parity data.
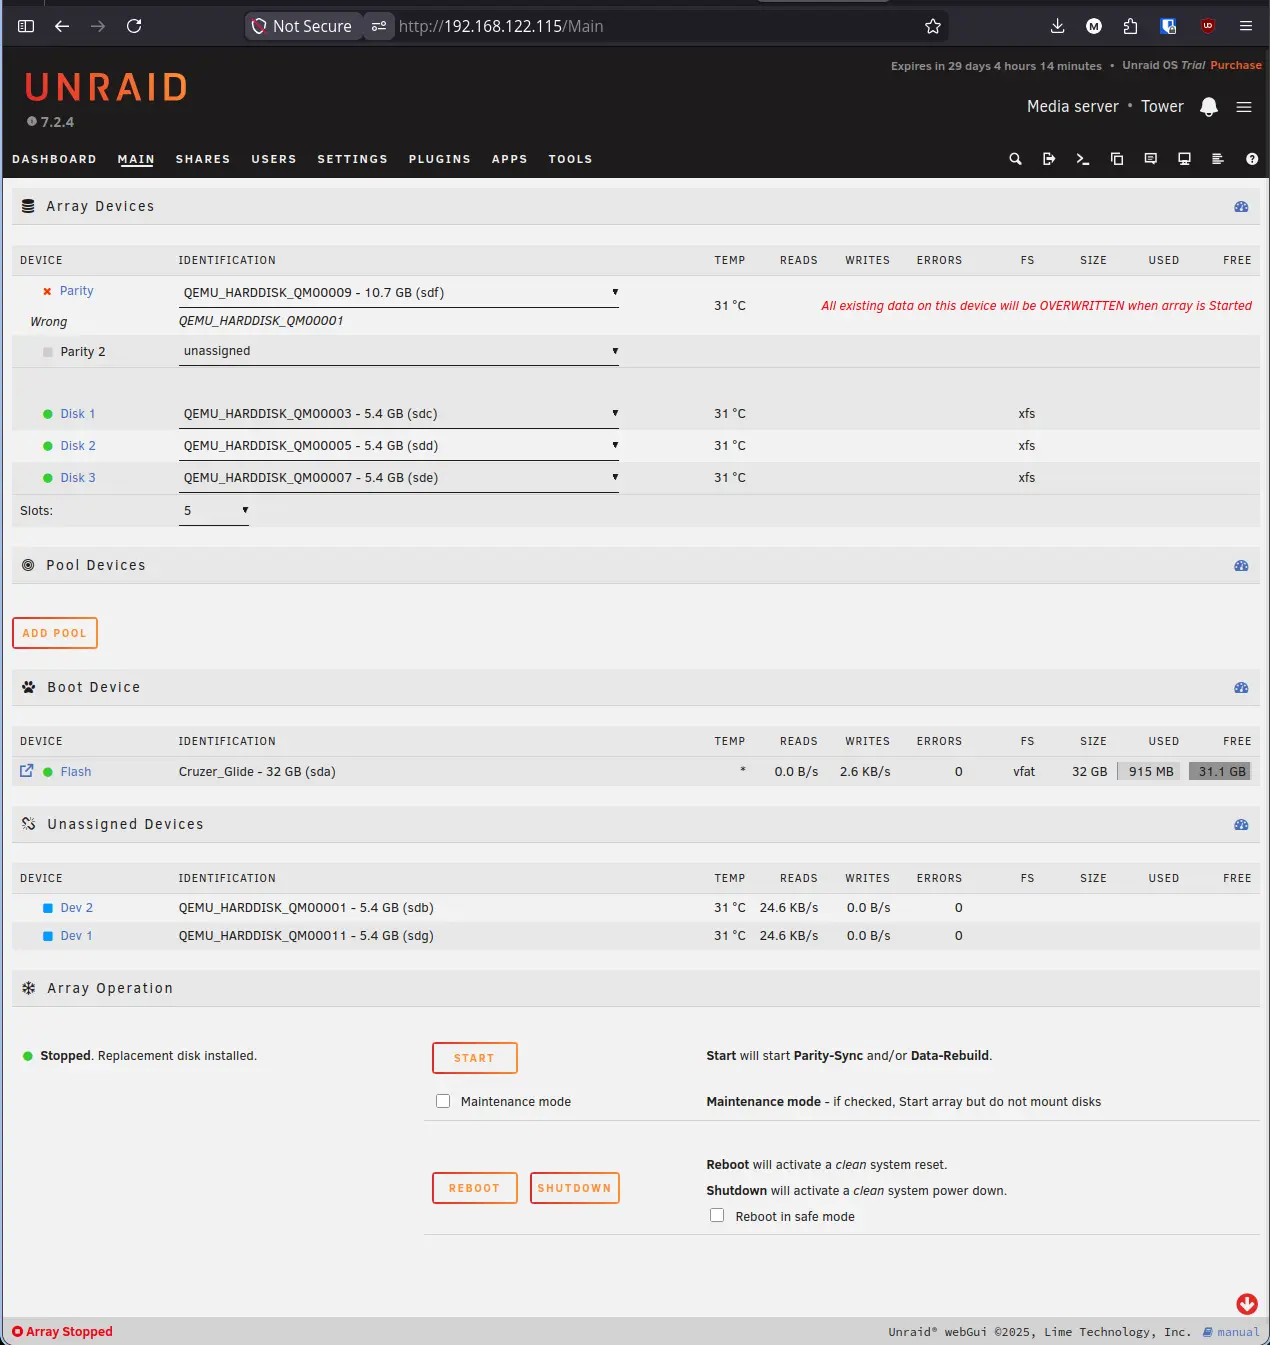
- Click Start to restart the array. Unraid will begin a Parity Sync, rebuilding parity data onto the new 10.7GB drive.
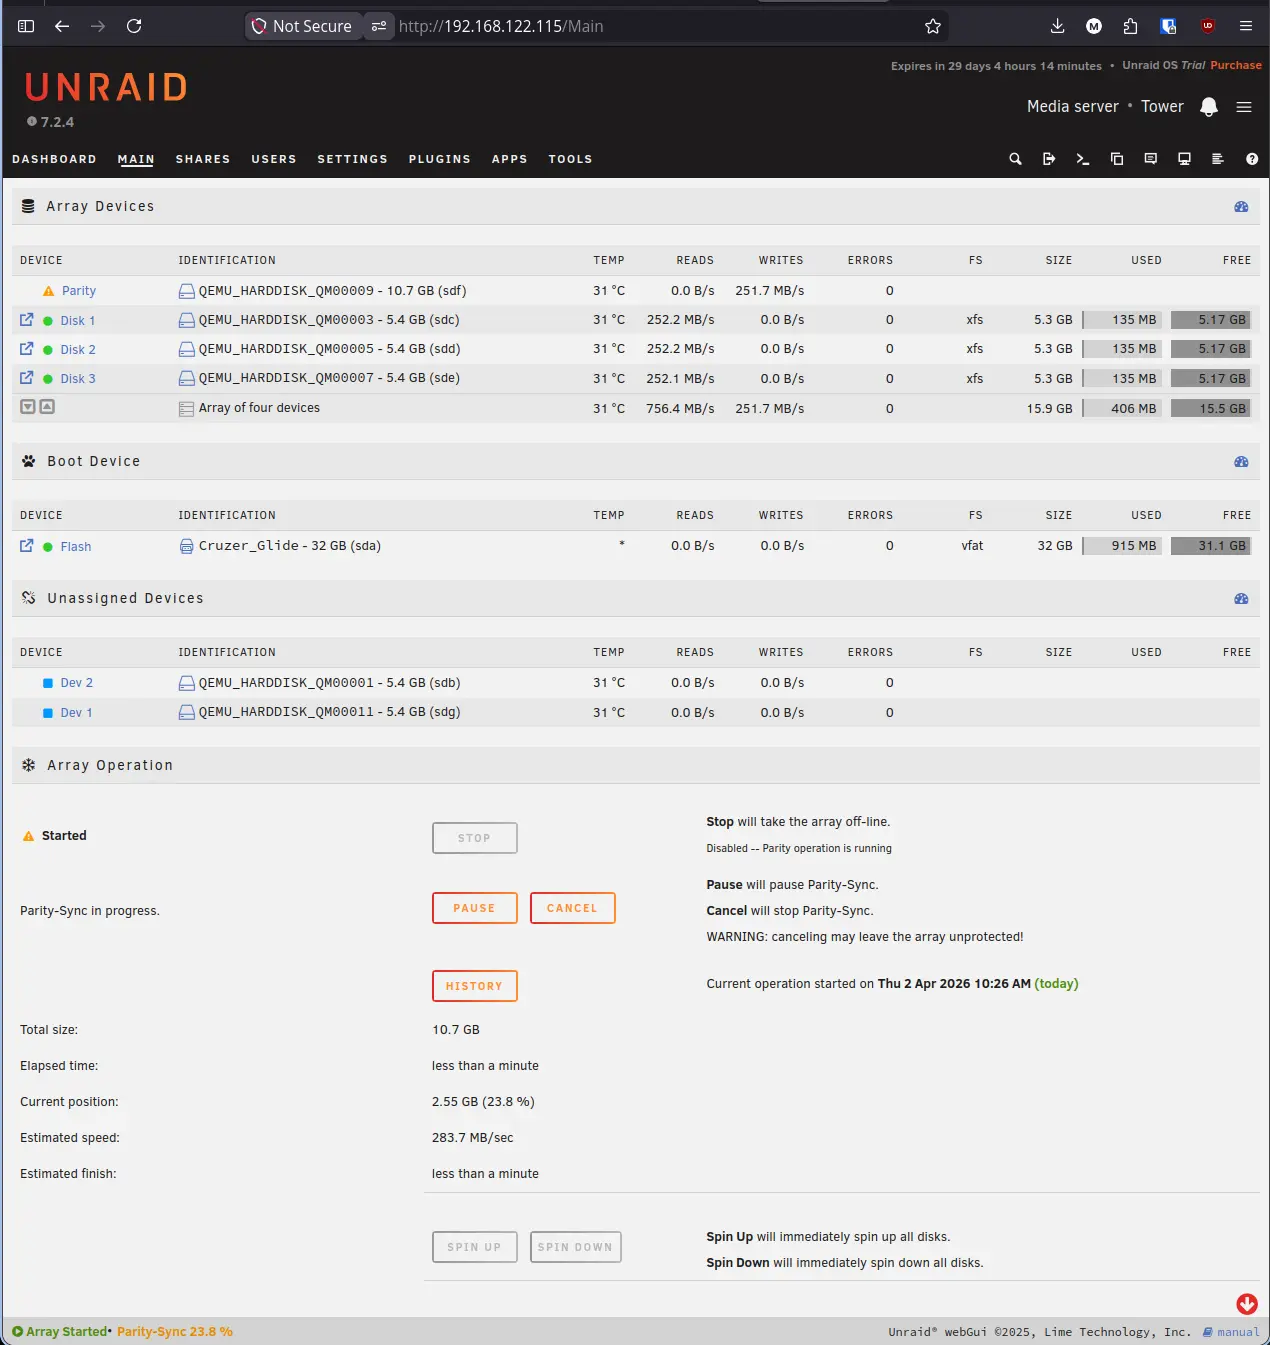
Note: Do not power off the server or make further drive changes while the sync is running. Cancelling a parity sync leaves the array unprotected.
- Wait for the sync to complete. The status will update to Parity is valid when done.
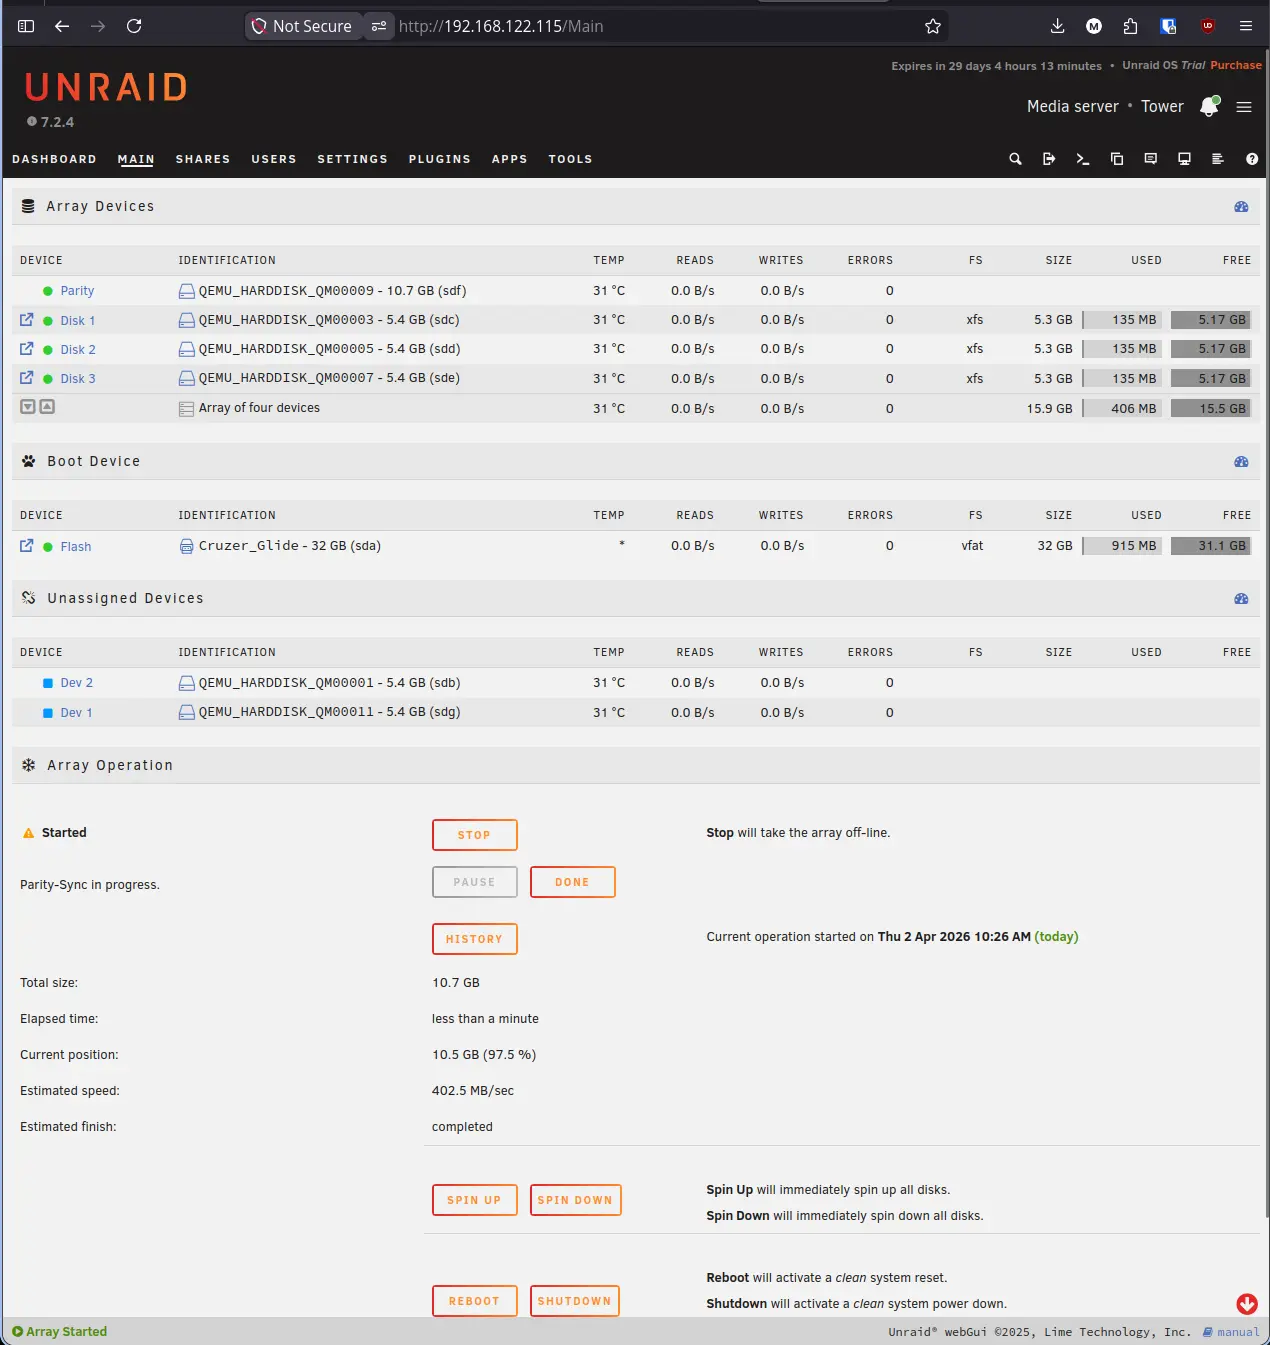
Step 4: Add the Reclaimed and New Drives#
With parity upgraded, the old 5.4GB parity drive is now sitting in Unassigned Devices. We can add it to the array as a data drive along with the brand new 5.4GB drive.
- Stop the array again.
- The Slots dropdown controls how many disk slots are visible. Increase it to accommodate both new drives.
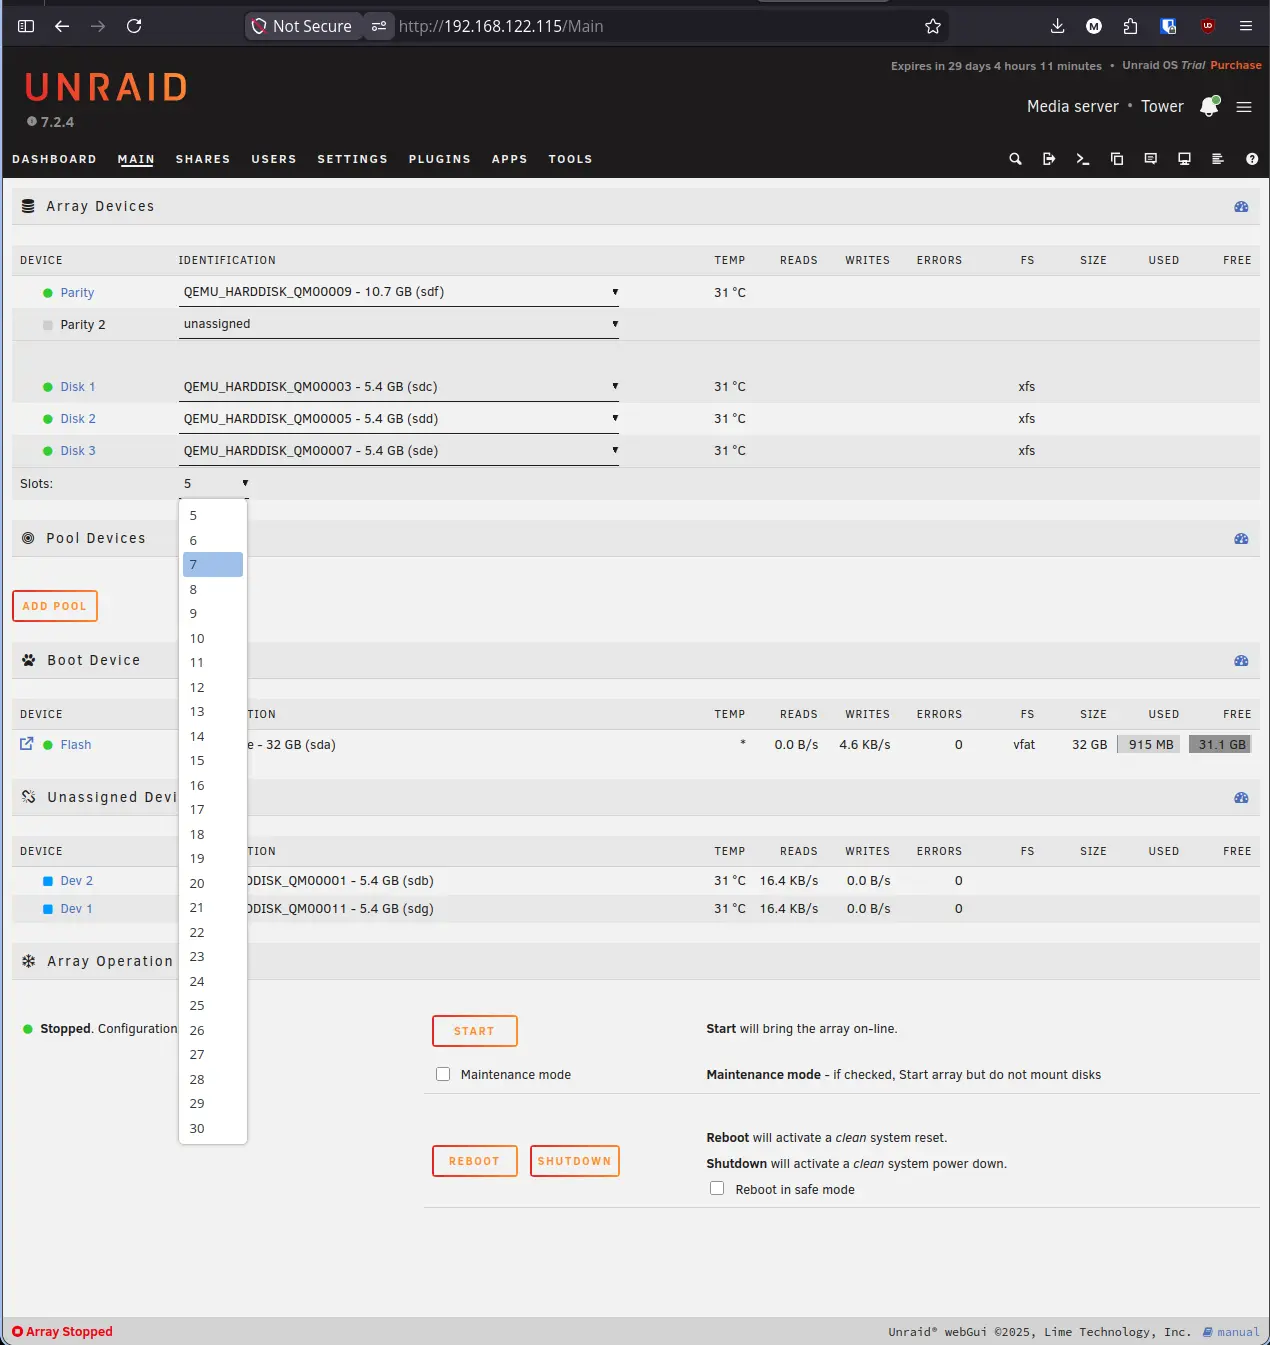
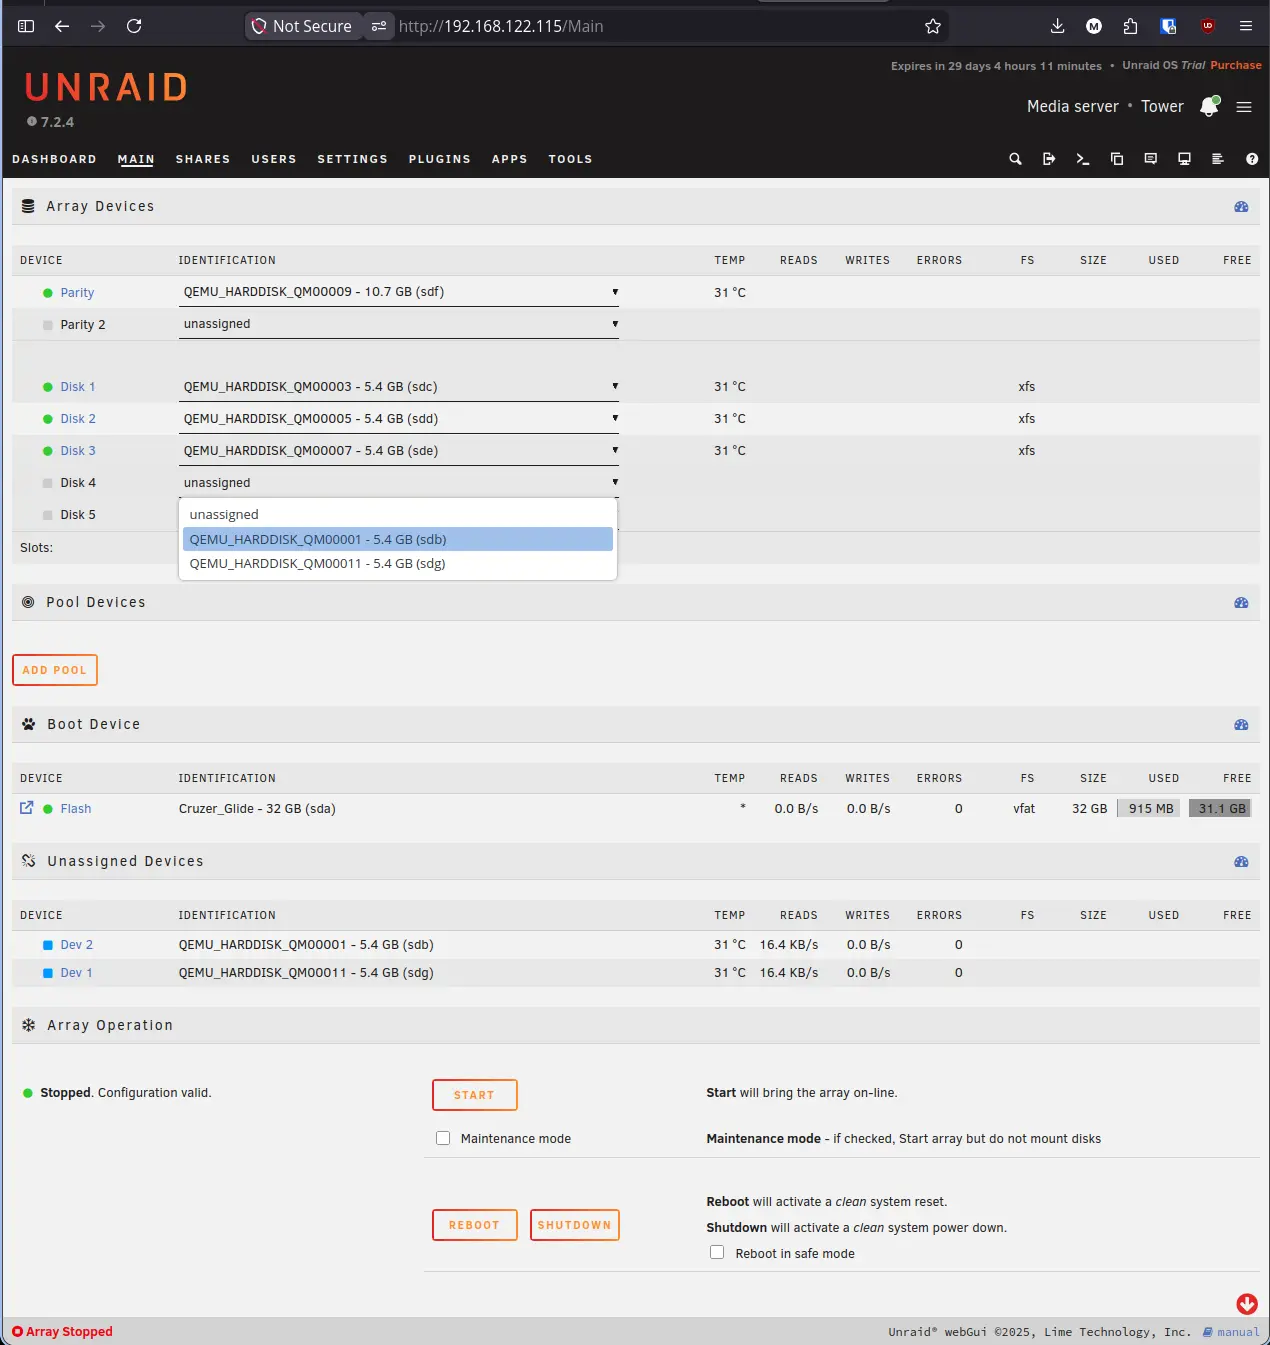
- Click the Disk 4 dropdown and select the old parity drive (sdb).
- Click the Disk 5 dropdown and select the new 5.4GB drive (sdg).
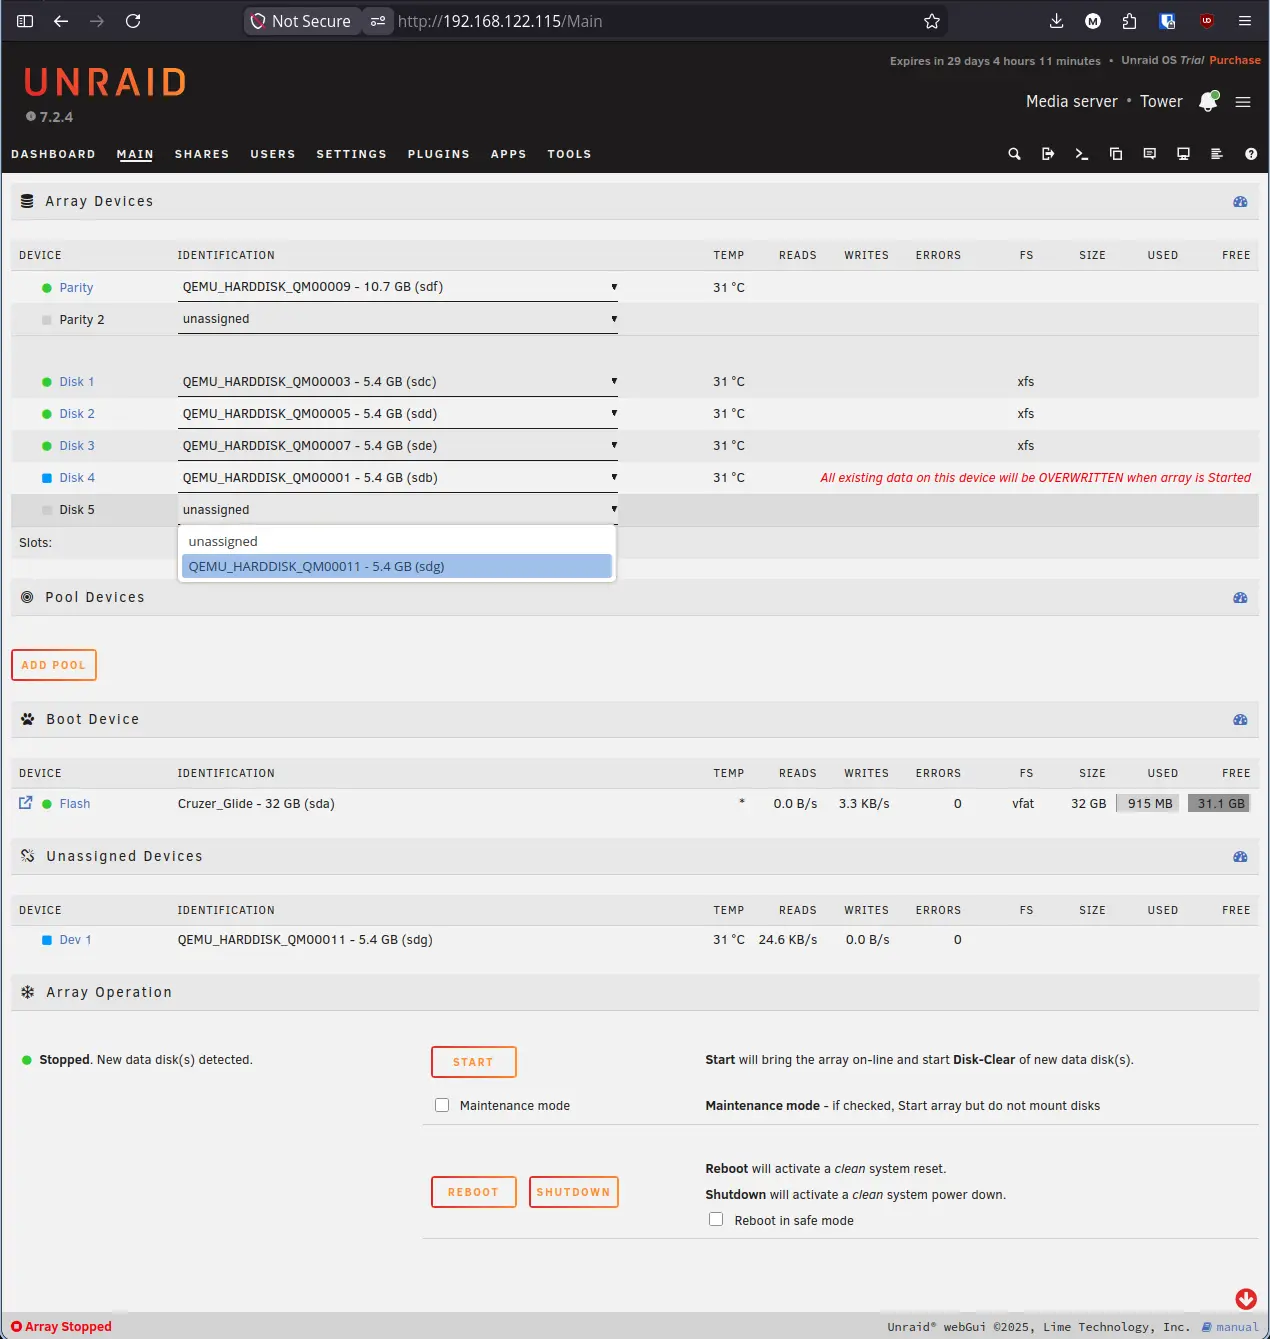
- Both drives will show the overwrite warning in red. This is expected for drives being added to the array for the first time.
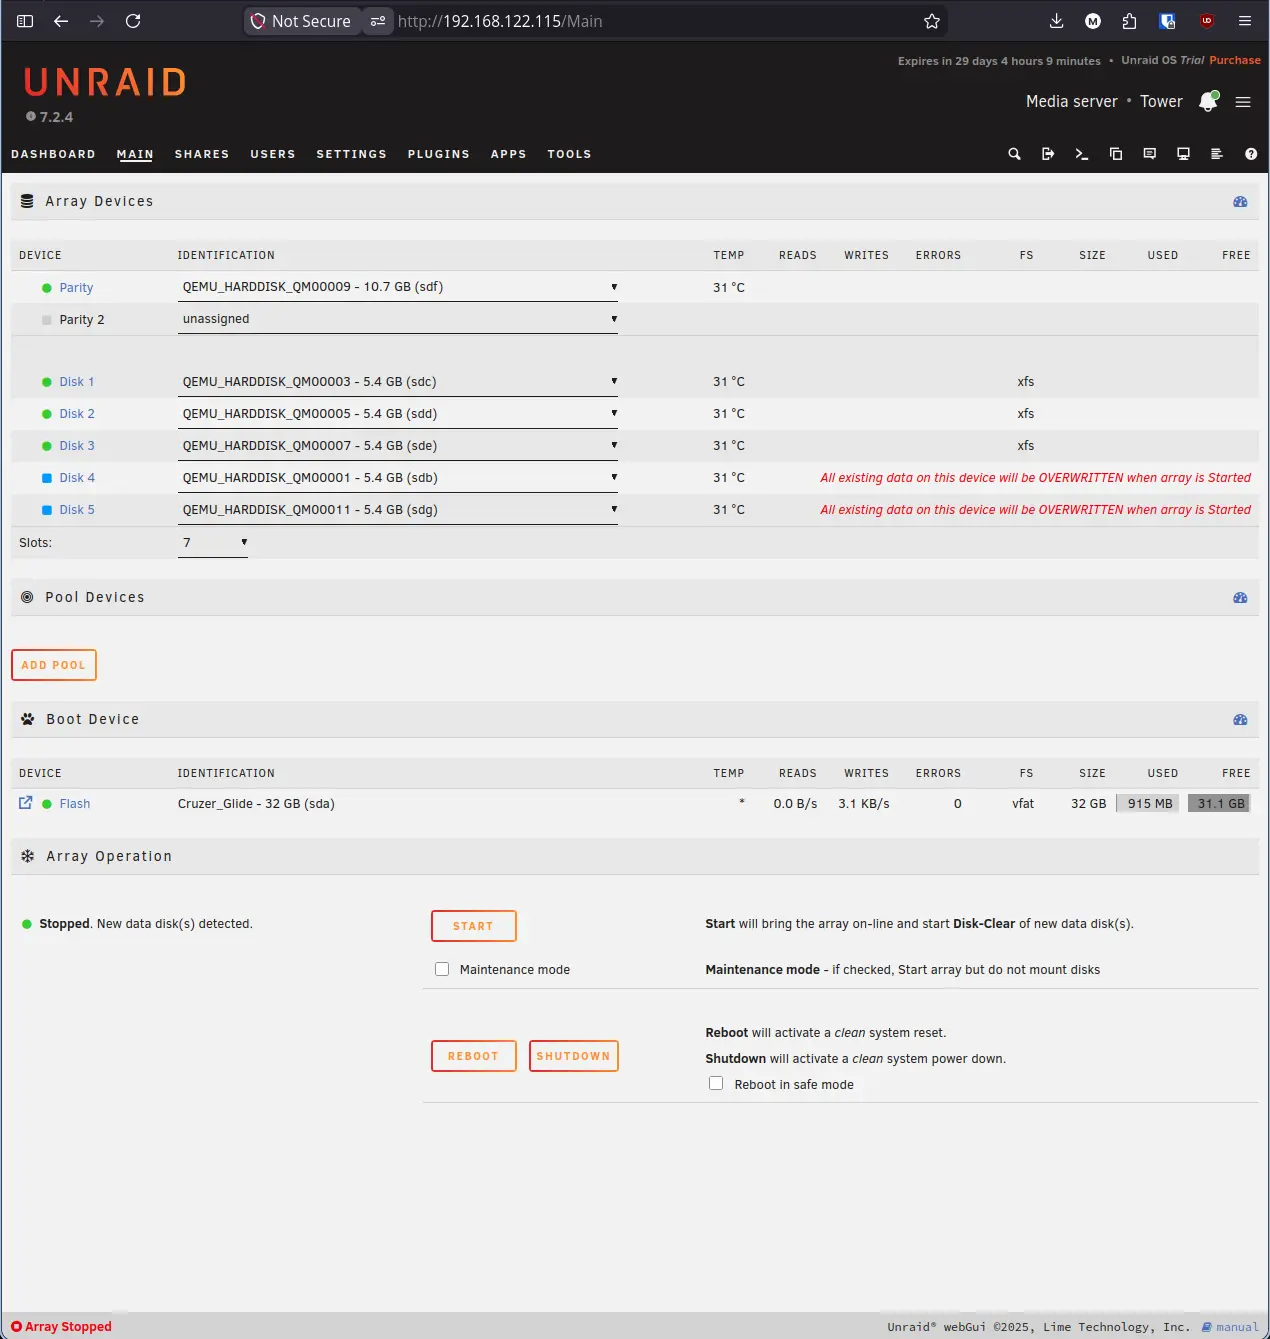
Step 5: Format the New Drives#
With both drives assigned, start the array and format them so Unraid can use them for storage.
- Click Start. Unraid will begin a Disk-Clear operation on the new drives before formatting them.
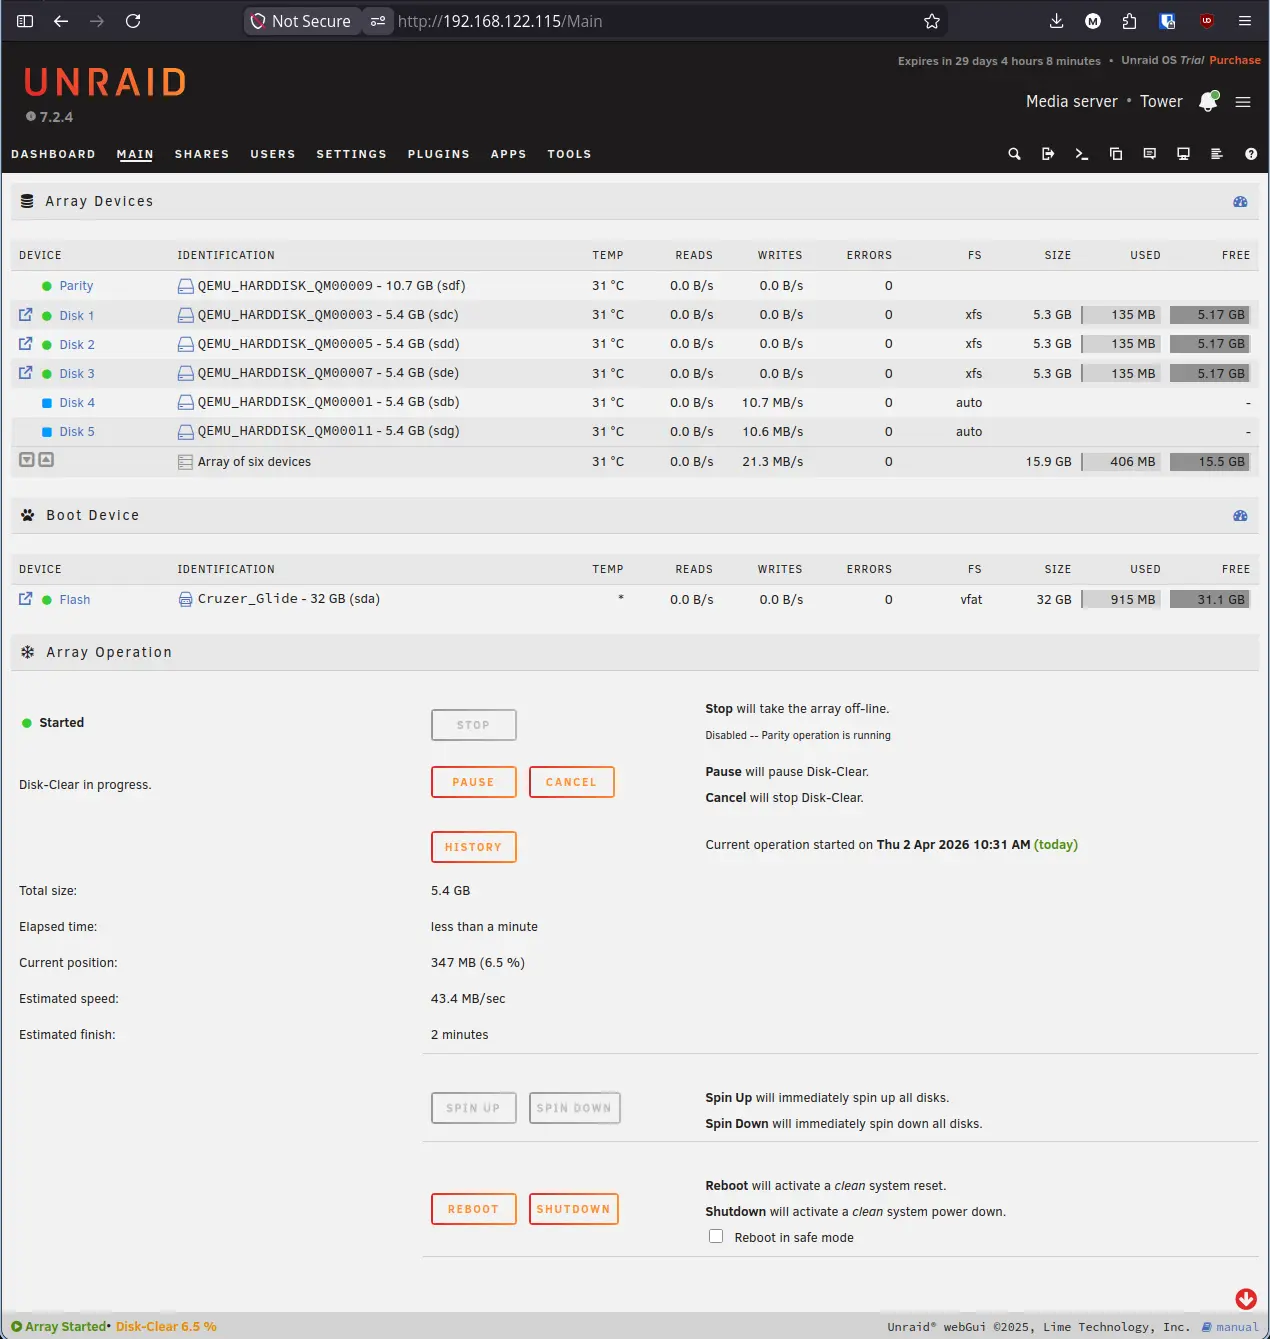
- Once Disk-Clear completes, Unraid will show both drives as Unmountable and present a Format button with a Yes, I want to do this checkbox.
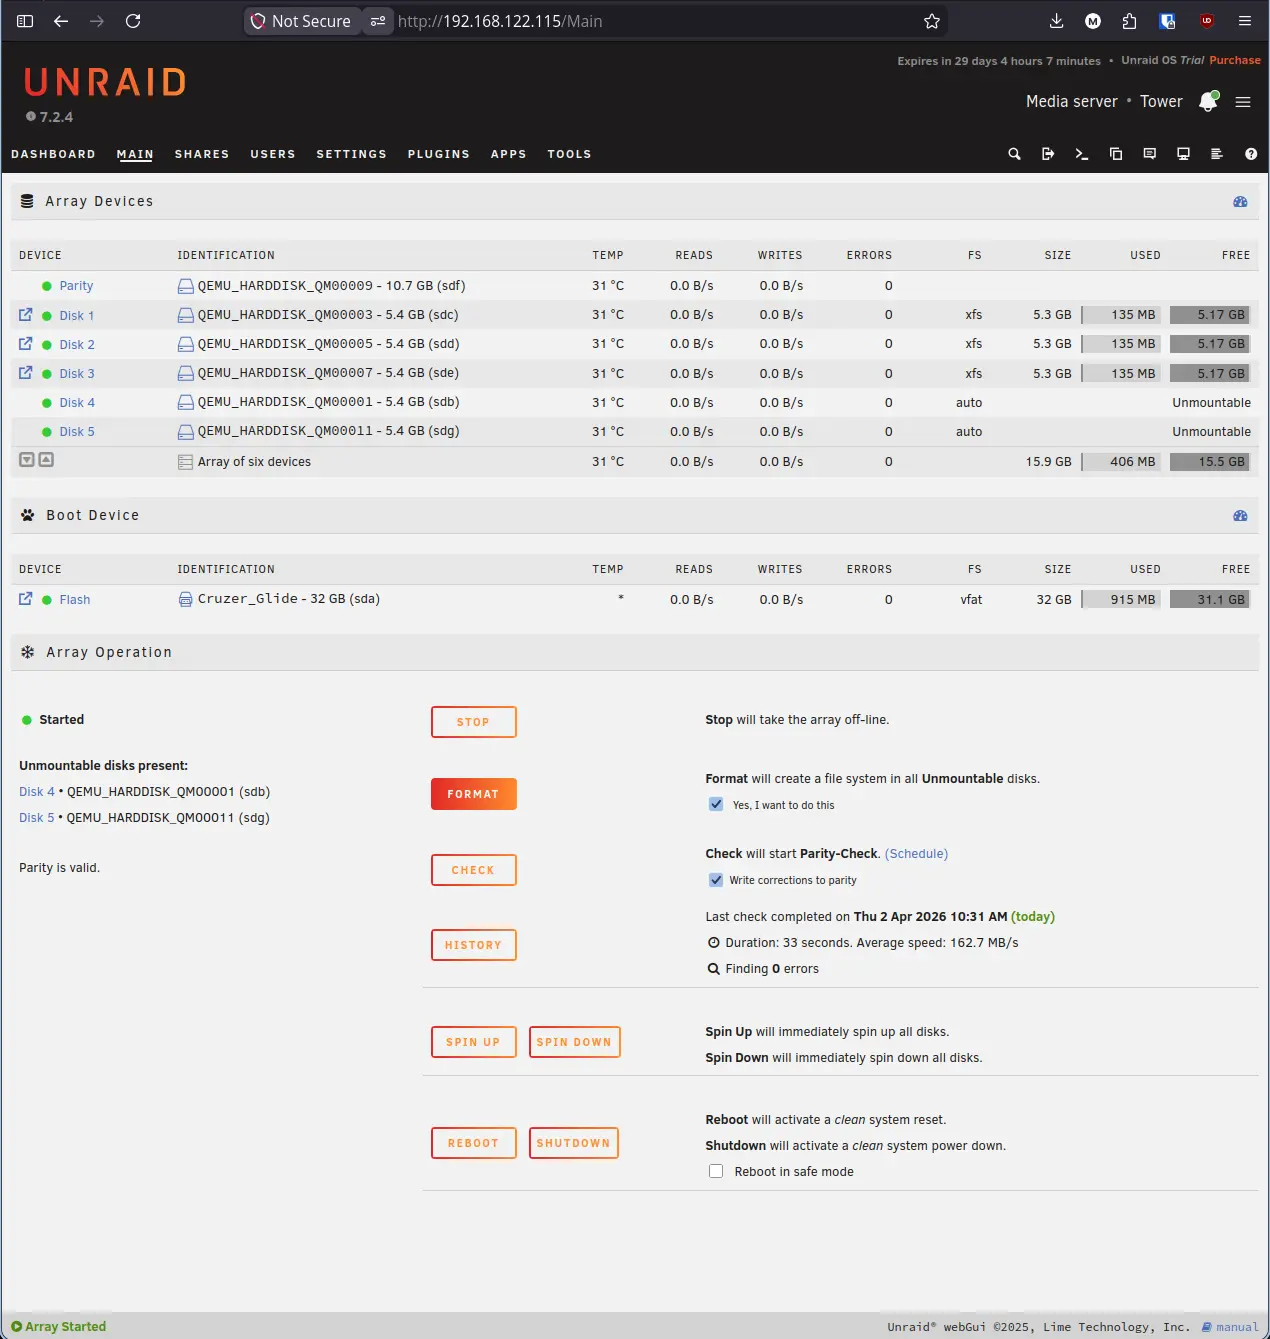
- Check the Yes, I want to do this box and click Format.
- Unraid will display a warning dialog explaining that all data on the drives will be erased. Click OK to confirm.
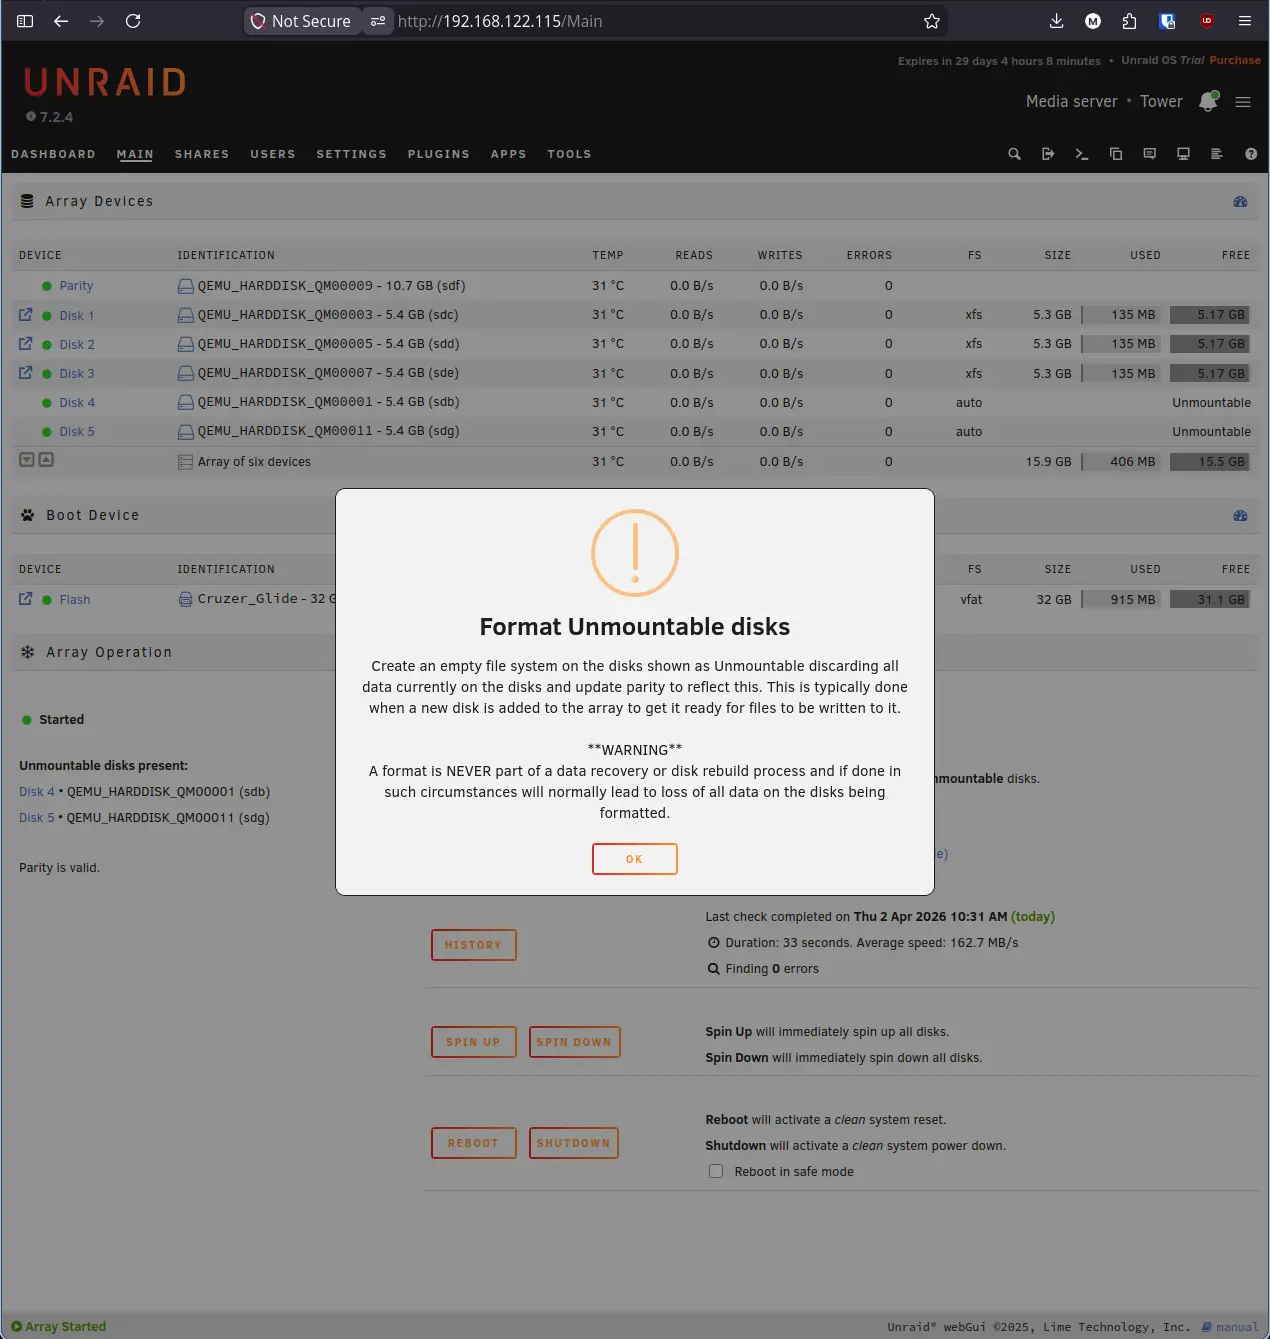
- Unraid will format both drives and run a final parity sync to extend protection to the new disks. Wait for it to complete.
Step 6: Confirm the Final Array#
Once formatting and parity sync are complete, your array should reflect the full expanded configuration.
Lab Notes & Troubleshooting#
A new drive does not appear in Unassigned Devices. Power down the server and reseat the SATA data and power cables. If the drive still does not appear, test it in another machine to confirm it is functional.
SMART test returns “Completed without error” but the drive has high reallocated sector count. Check the Attributes tab on the drive details page. A high reallocated sector count (Attribute 5) on a new drive is a red flag even if the short test passes. Do not add the drive to the array.
Parity sync is running very slowly. This is normal for large drives. A 4TB drive can take 8 to 12 hours to sync at typical speeds. Do not interrupt the sync or power off the server while it is running.
The Stop button is greyed out during parity sync. Unraid disables the Stop button while a parity operation is running to protect the array. Wait for the sync to complete or use the Pause button if you need to temporarily halt it.
Array shows a red disk after a drive change. Stop the array, reassign the drive if it is still available, restart, and let parity rebuild before making further changes.
Summary#
You have successfully upgraded your parity drive to a larger one, reclaimed the old parity drive as usable storage, and added a brand new data drive to the array. The end result is more protected storage without losing a single byte of existing data. This is the standard Unraid upgrade path and one you will repeat as your storage needs grow over time.
Next Step: Managing Users and Permissions in Unraid