Unraid is the operating system that turns a collection of mismatched hard drives into a redundant, high-performance storage array. It serves as the primary foundation for every other service in the Hofiverse.
Executive Summary#
This guide covers the transition from a blank USB stick to a fully parity-protected storage array. We will configure the BIOS to boot the OS, perform the initial disk formatting to prepare the server for data, and configure the array to start automatically on every boot.
Prerequisites#
| Component | Requirement |
|---|---|
| Flash Drive | 8GB–32GB USB 2.0 (High Quality) |
| Storage | 1 Parity Drive + 1 or more Data Drives |
| Network | Ethernet connection to local network |
| Unraid License | A free 30-day trial is available at unraid.net. Paid tiers (Basic, Plus, or Pro) are available if you decide to continue. |
| Desktop or Laptop | To run the USB Creator tool and access the Unraid web UI |
Assumptions: This guide assumes you are installing Unraid on a dedicated desktop computer and managing it from a separate laptop on the same home network. The server is connected to your router via ethernet, and your laptop is connected to the same network either via ethernet or Wi-Fi. Steps that reference the server screen assume you have a monitor and keyboard temporarily connected for the initial BIOS setup.
Implementation#
Step 1: Prepare the Boot Media#
Download the Unraid USB Creator from the official website. This tool prepares your flash drive to act as the server’s hard drive, as Unraid runs entirely from memory (RAM) after booting. If you want a broader overview of the process before diving in, the Unraid Getting Started guide is a helpful reference.
- Select the Stable branch to ensure system reliability.
- Select your USB Flash drive from the dropdown list.
- Enable Allow UEFI Boot to ensure compatibility with modern motherboards.
- Click Write and wait for the verification to complete.
Step 2: BIOS and First Boot#
Plug the USB into a USB 2.0 port on your server. USB 3.0 ports can cause the drive to drop its connection mid-boot, which prevents the OS from finishing its startup sequence and leaves the server unresponsive.
- Power on the server and tap
DelorF2to enter the BIOS menu. - Disable Secure Boot and set the USB Flash drive as the Primary Boot Device.
- Save and Exit to allow the server to boot into the Unraid menu.
Step 3: Array Assignment#
Once Unraid finishes booting, your server monitor will display a local IP address, something like 192.168.1.X. On your laptop, open a browser and type that address into the address bar. This brings up the Unraid web UI (user interface), which is how you will manage the server going forward.
- Set Root Password: Click the Users tab in the top navigation bar. Select the
rootuser and set a strong password. This is the master password for your server, so do not skip this step. - Navigate to the Main tab: Click Main in the top navigation bar. This is where your physical drives are listed. You will see them referenced by their device names (e.g.,
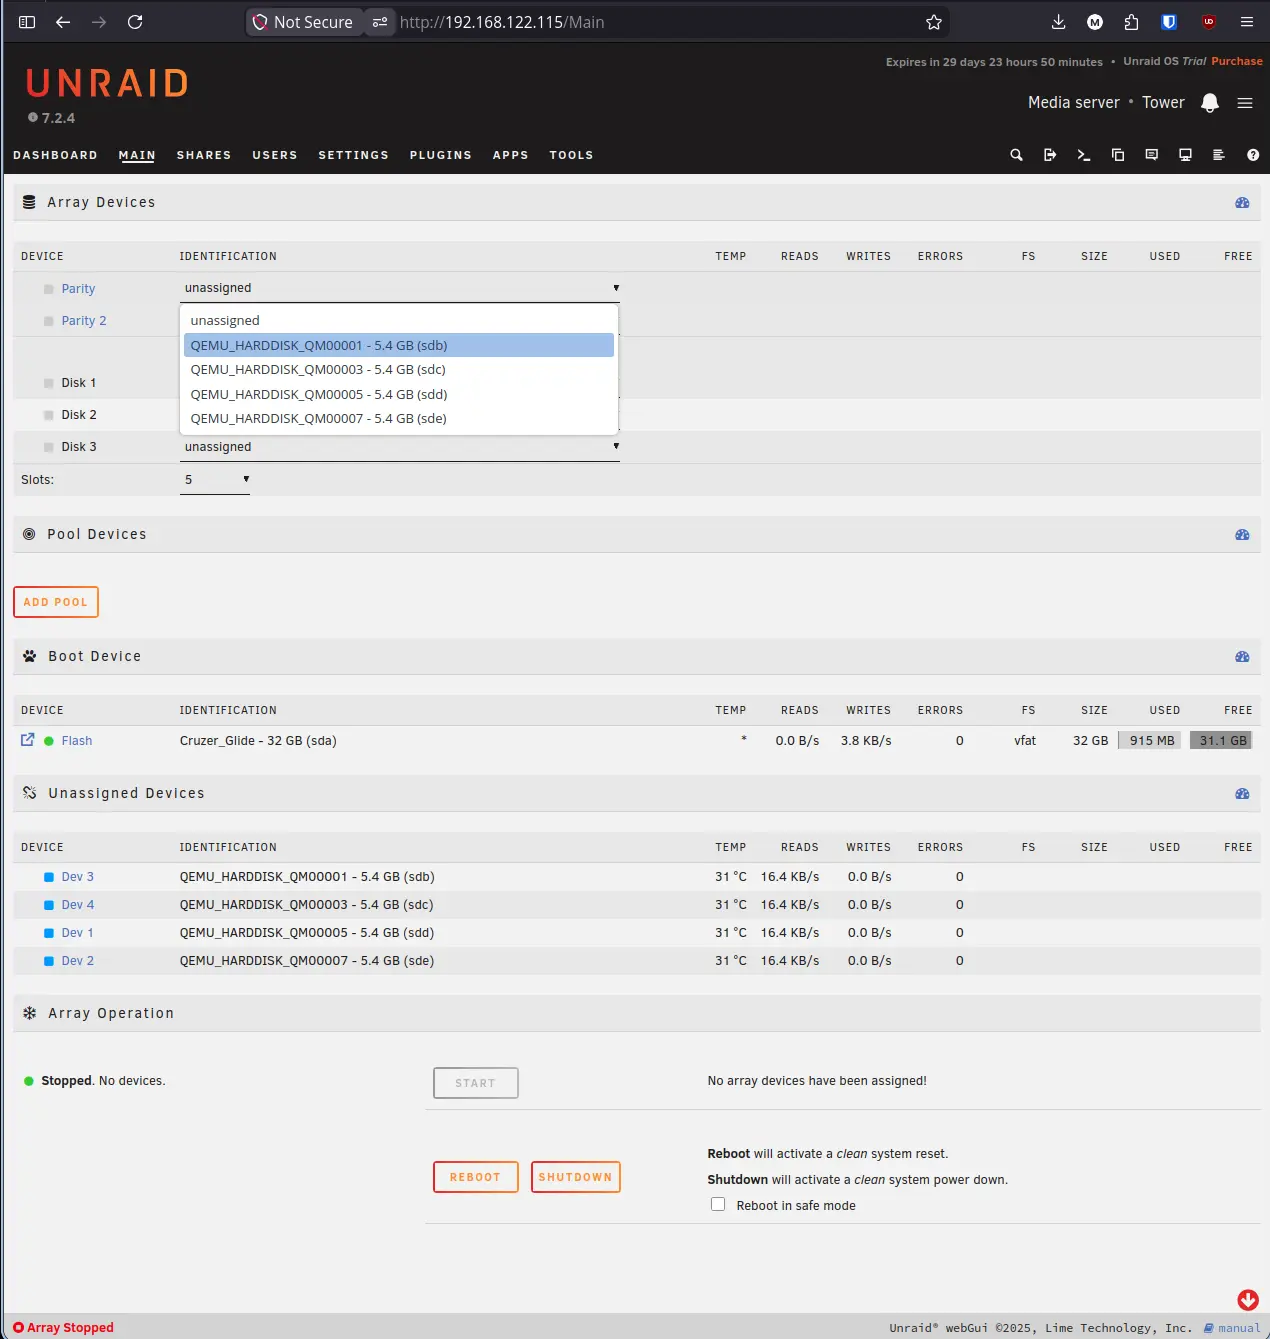
sdb,sdc) along with their size and model number. - Assign the Parity Drive: Under the Parity section, use the dropdown to select your largest drive. The parity drive is what allows Unraid to rebuild lost data if another drive fails. It must be equal to or larger than your biggest data drive. If you have mixed drive sizes, the largest drive must always be parity, otherwise Unraid will not allow you to add smaller drives later.
Note: The parity drive does not contribute to your usable storage space. For example, three 4TB drives will give you 8TB of usable space, not 12TB. The third drive is dedicated entirely to redundancy.
- Assign Data Drives: Under the Disk 1, Disk 2 sections (and so on), use the dropdowns to assign your remaining drives. These are where your files will actually be stored.
Step 4: Formatting and Initialization#
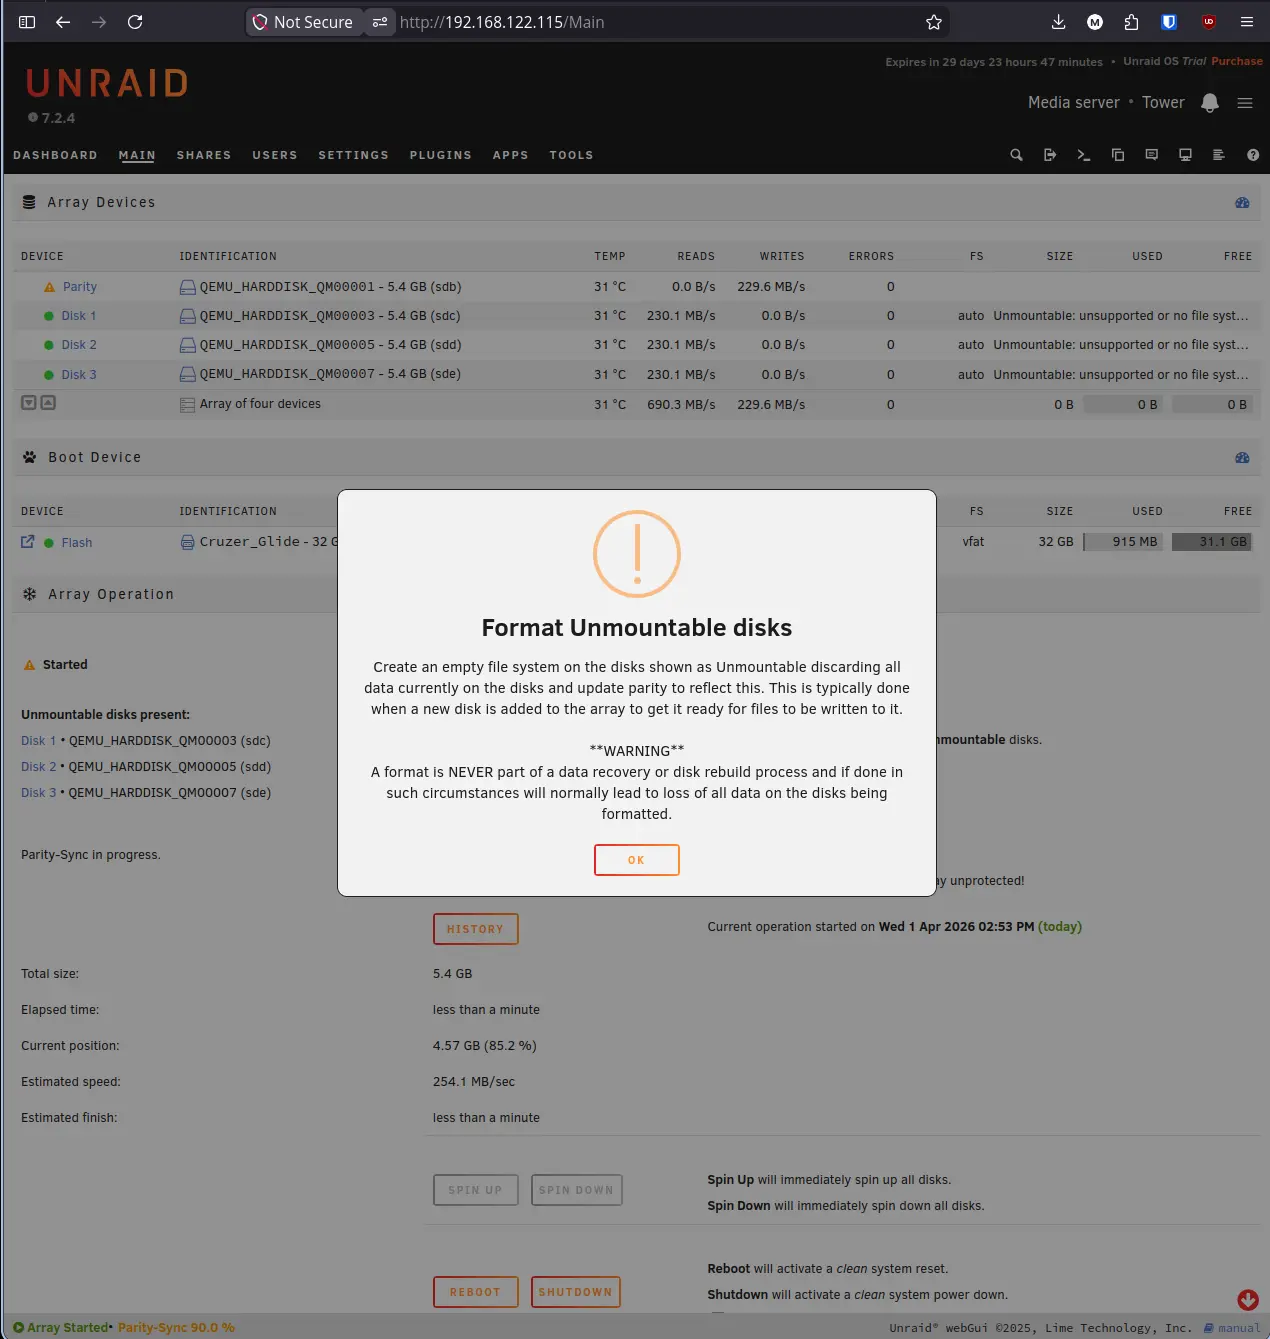
After assigning drives, Unraid will report that the disks are unmountable. This is normal for new drives that do not yet have a file system.
- Scroll to the bottom of the Main tab and click Start.
- The Warning: A pop-up will appear informing you that the disks are unmountable. This is the final safety gate before data is wiped.
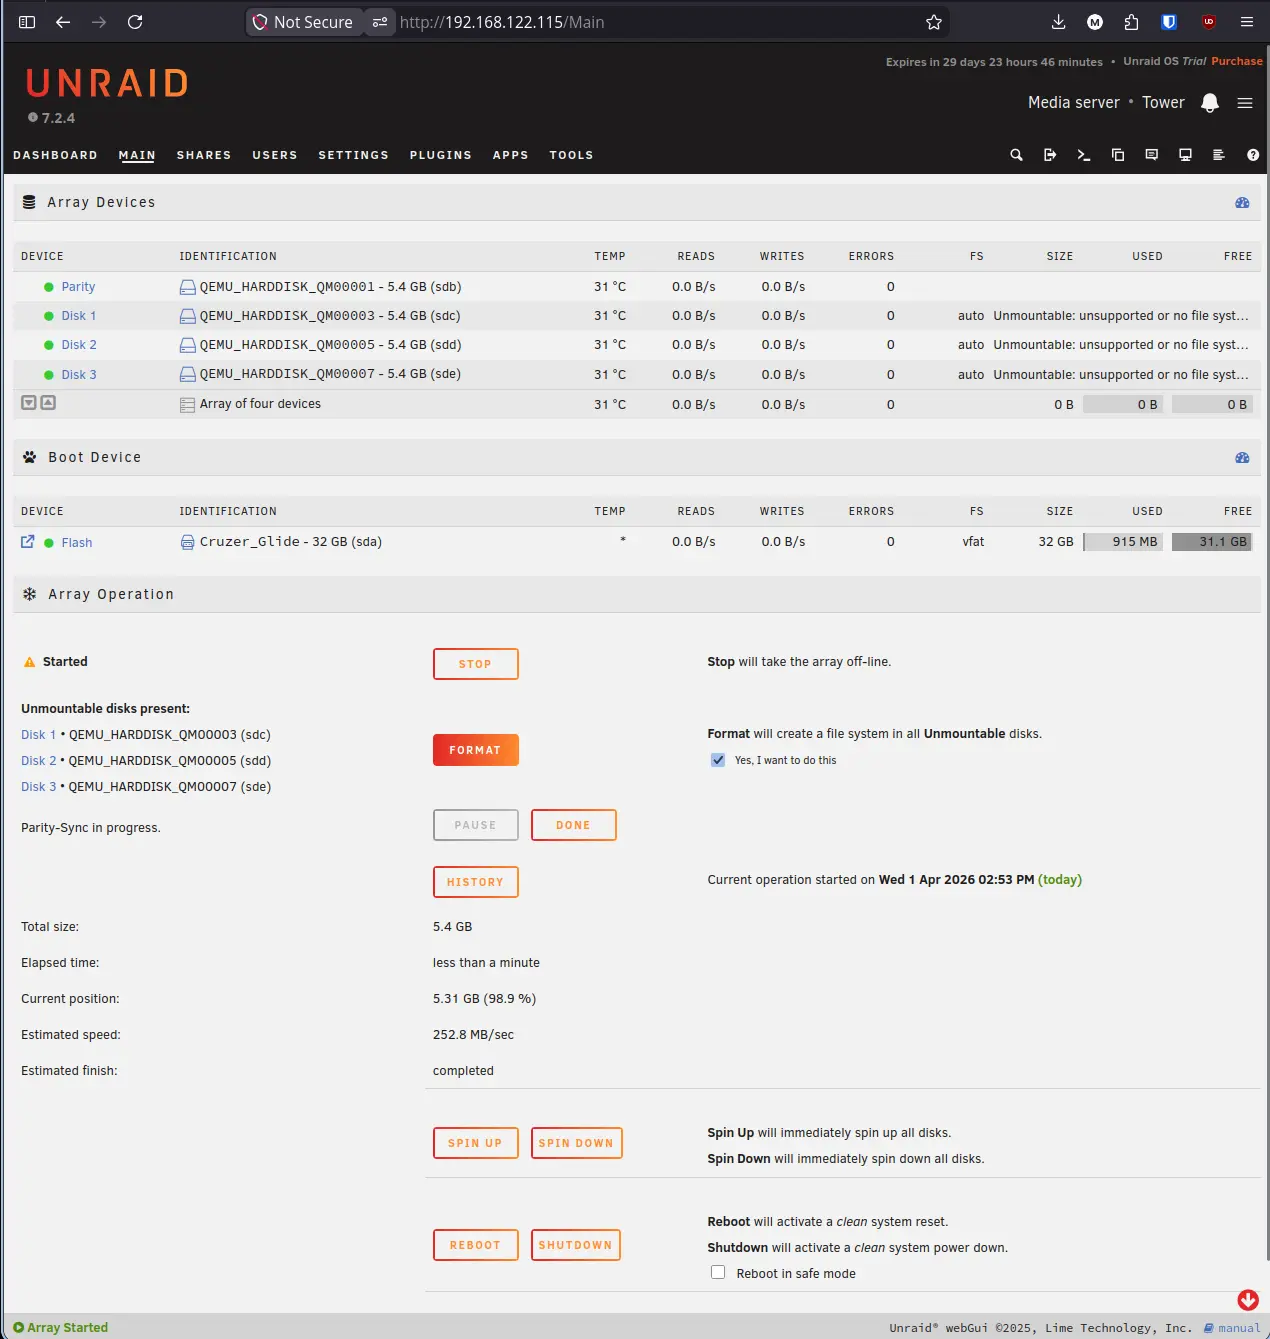
- Confirmation: Under the array status, check the box labeled Yes, I want to do this and then click the Format button.
- Formatting Active: The system will transition into an active formatting state. You will see the status of the drives change as the file system is written.
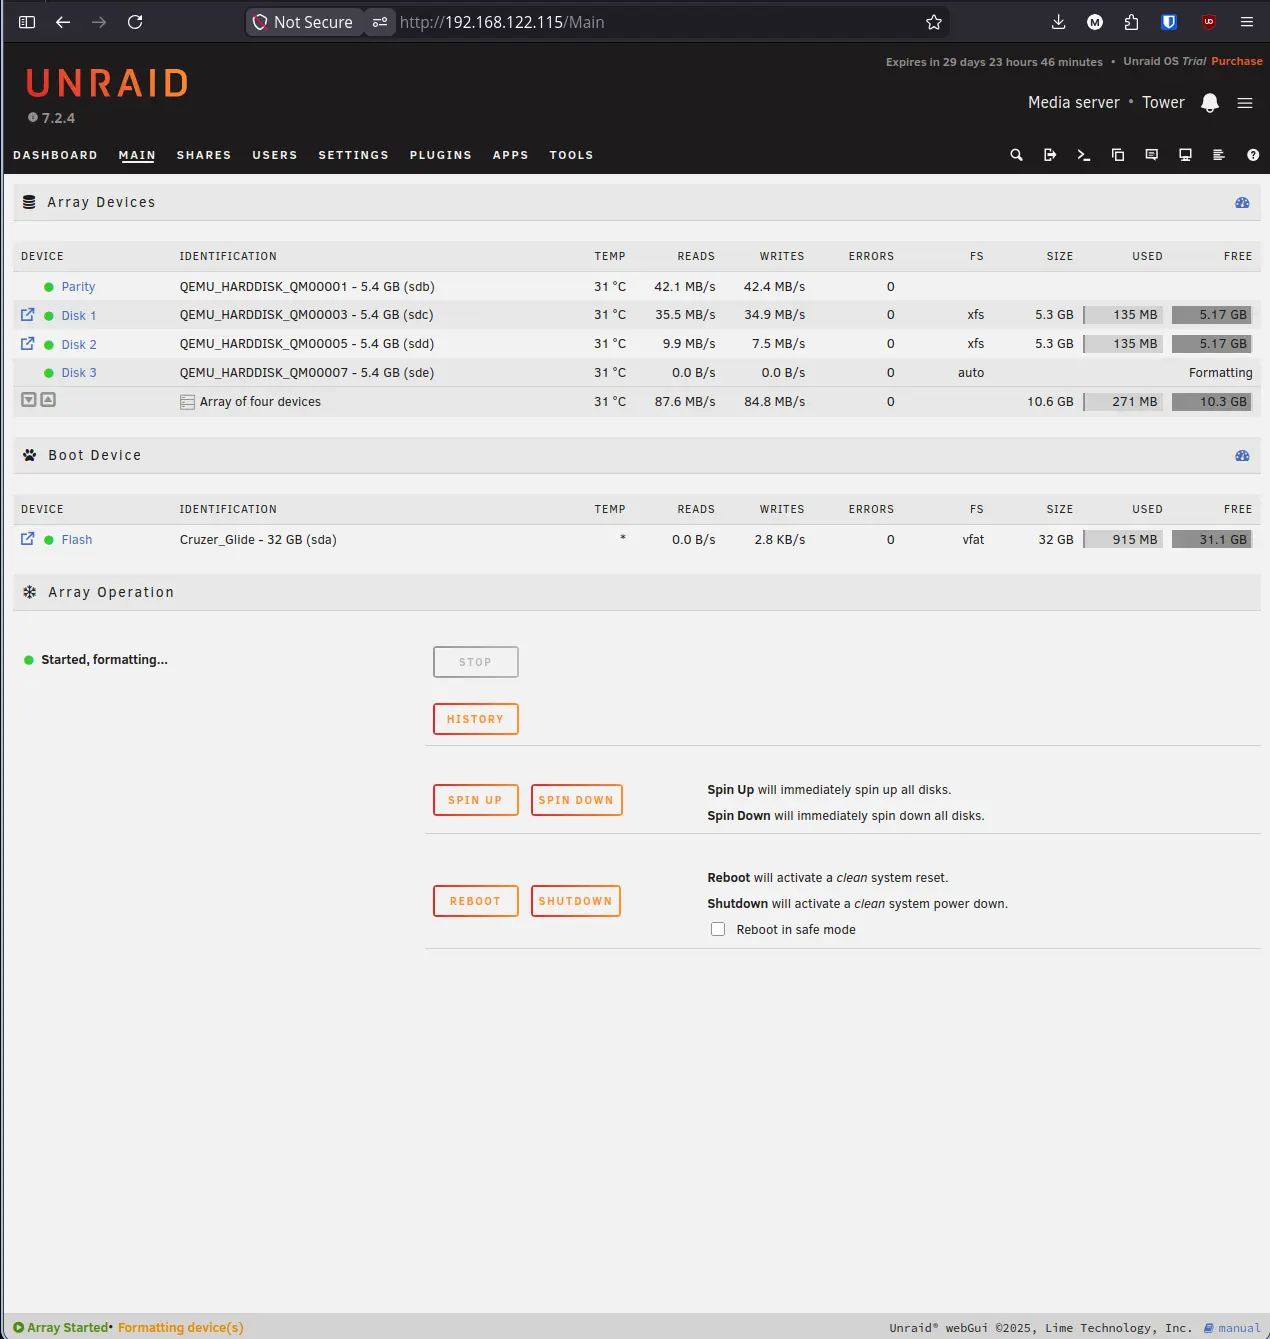
Note: Unraid supports several file systems, but XFS is the recommended choice for beginners. It is stable, well-tested, and allows you to expand your array one disk at a time without any complicated setup.
Step 5: Enable Array Auto-Start#
By default, Unraid requires you to manually click Start on the Main tab every time the server reboots. Enabling auto-start removes that requirement so the array mounts automatically and your Docker containers and services come online without any manual intervention.
- Click the Settings tab in the top navigation bar.
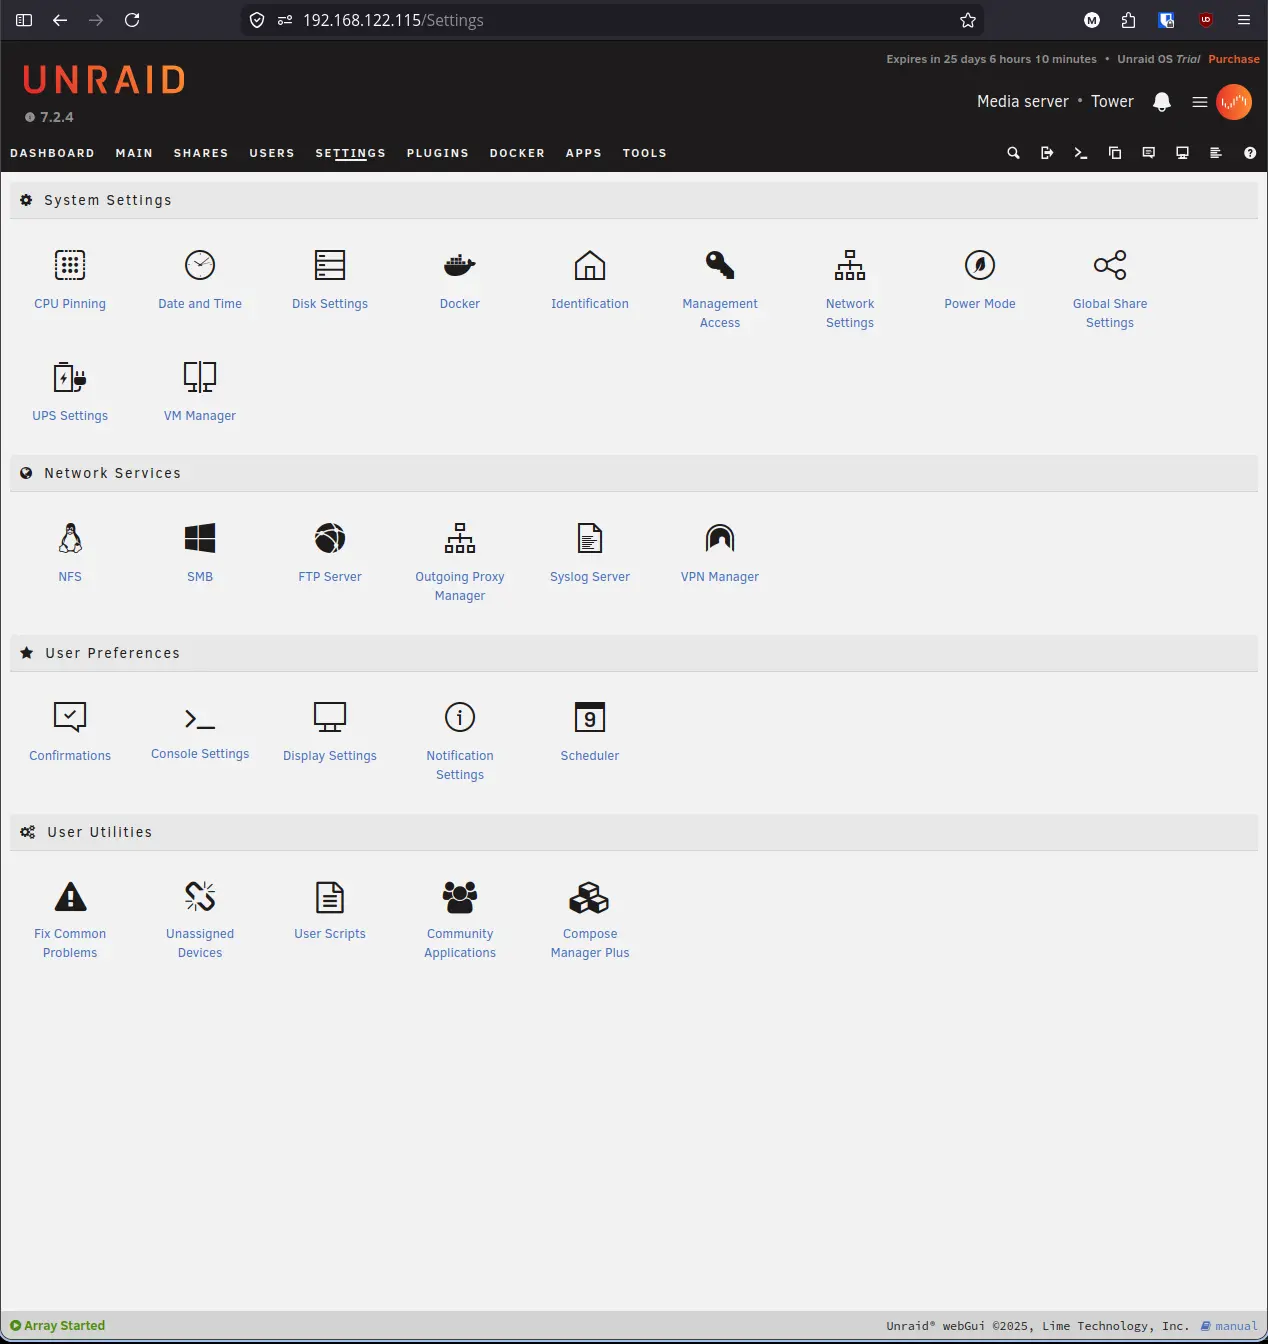
- Under the System Settings section, click Disk Settings.
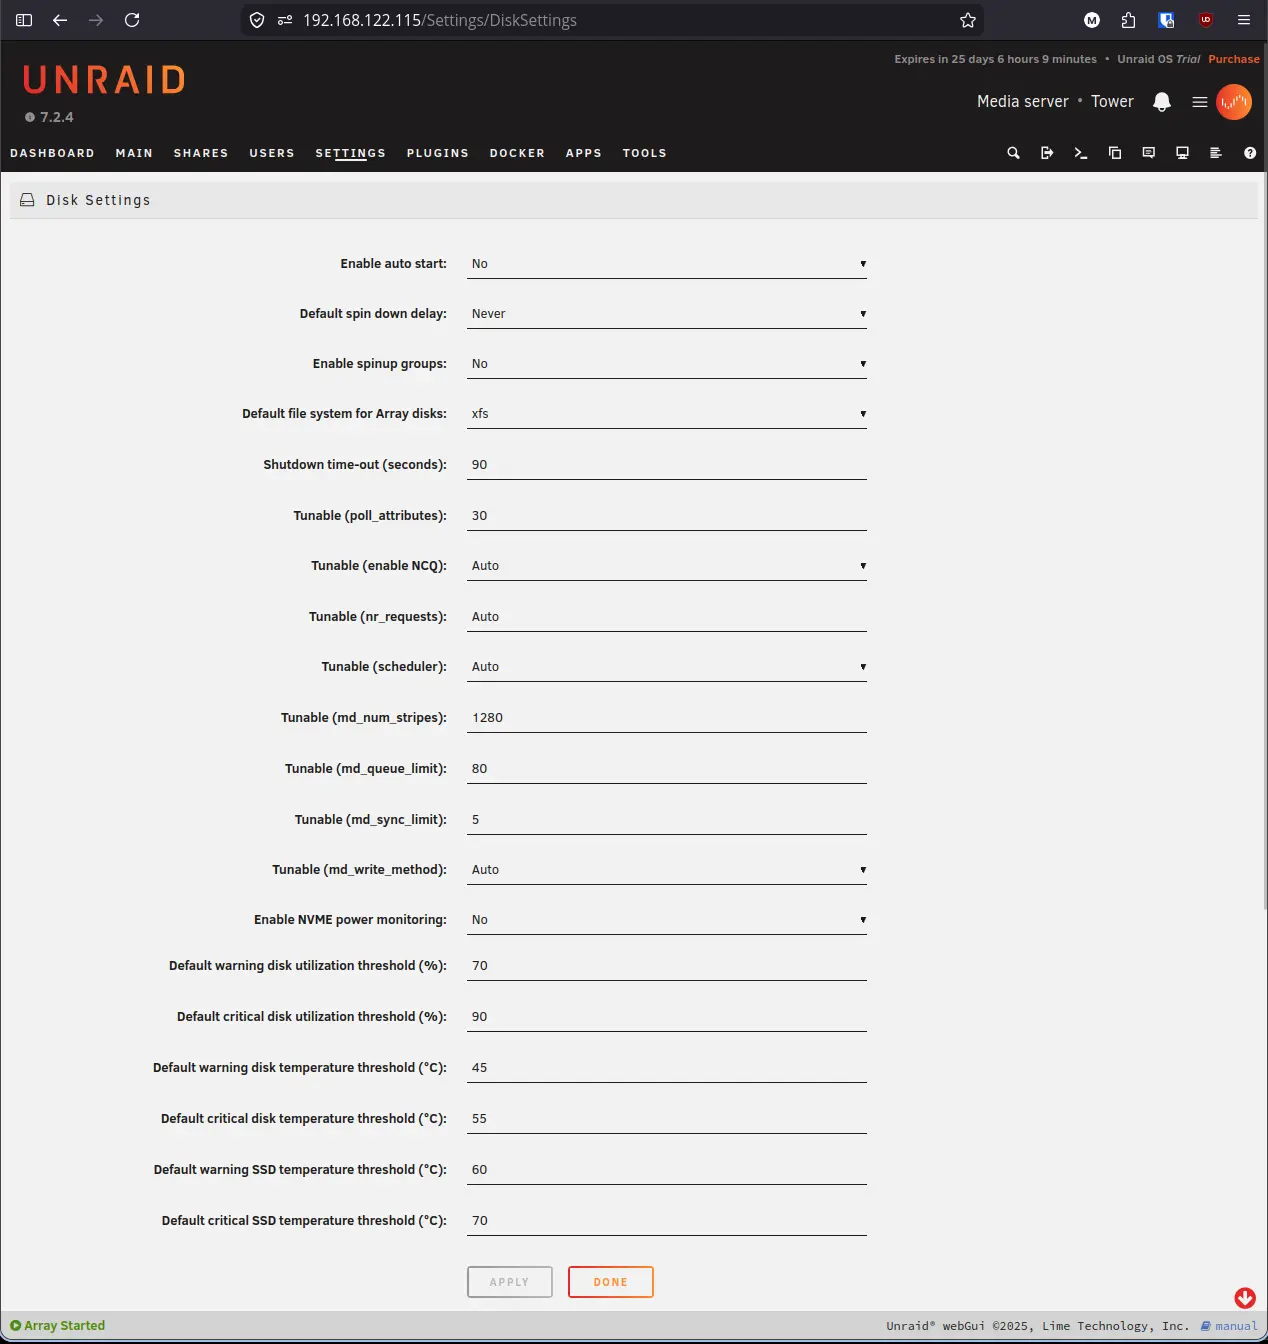
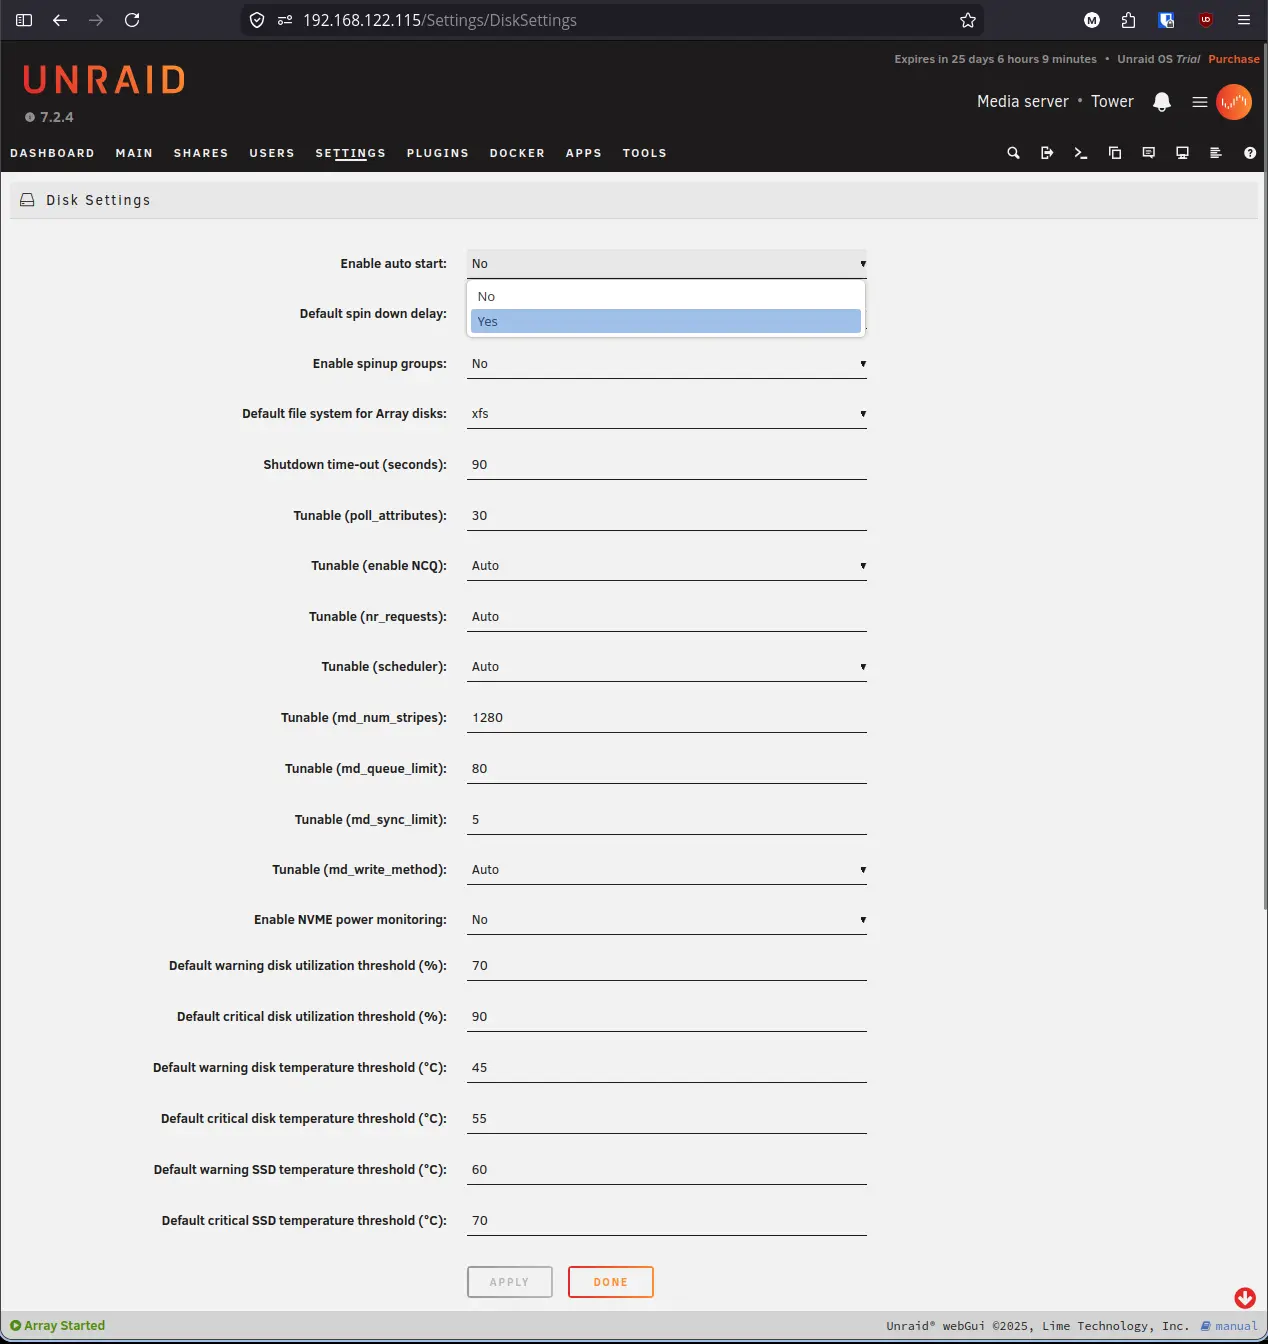
- Click the Enable auto start dropdown and select Yes.
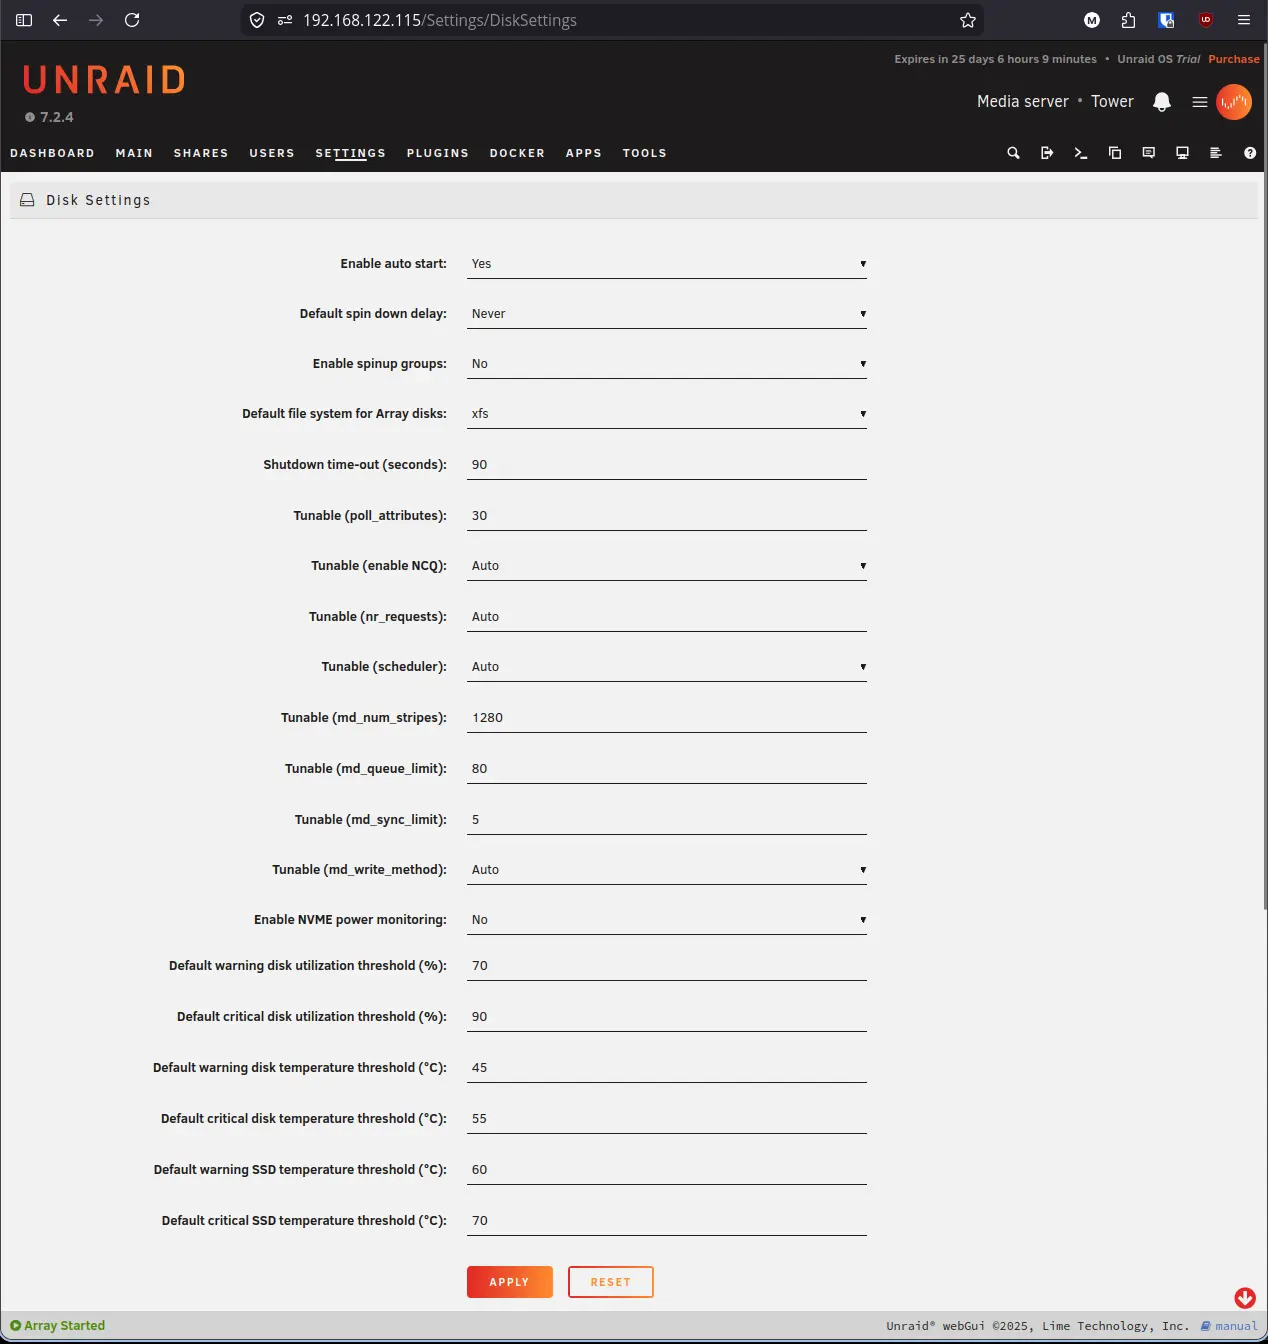
- Click Apply. The button row will update to show Apply in red, confirming the change is pending. Once saved, the page reloads with the new value in place.
Note: This setting takes effect on the next reboot. It does not affect the current session, so your array will continue running normally until you restart the server.
Step 6: Parity Sync and Success#
The system will now begin the “Parity Sync” process. This calculates the mathematical protection for your data.
- Monitor Progress: Check the status bar at the bottom of the Main tab. You will see the sync speed and estimated time to completion.
Note: The server is usable during the parity sync, but disk performance will be reduced. Avoid moving large amounts of data onto the array until the sync reaches 100%.
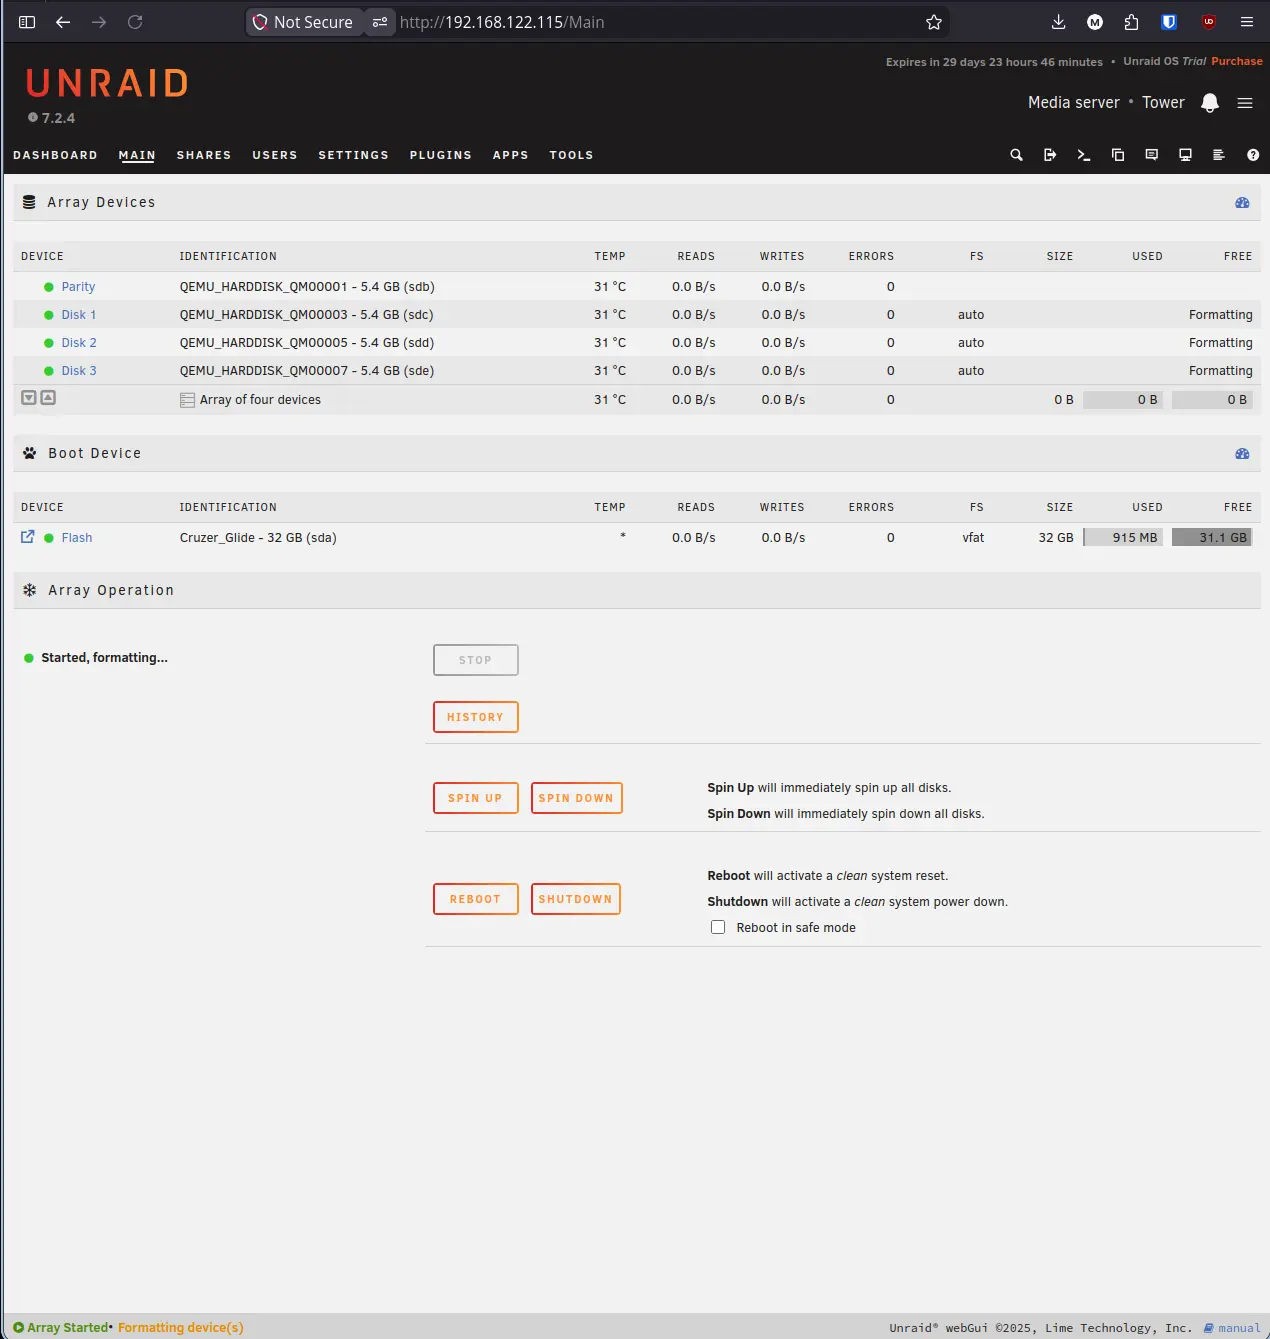
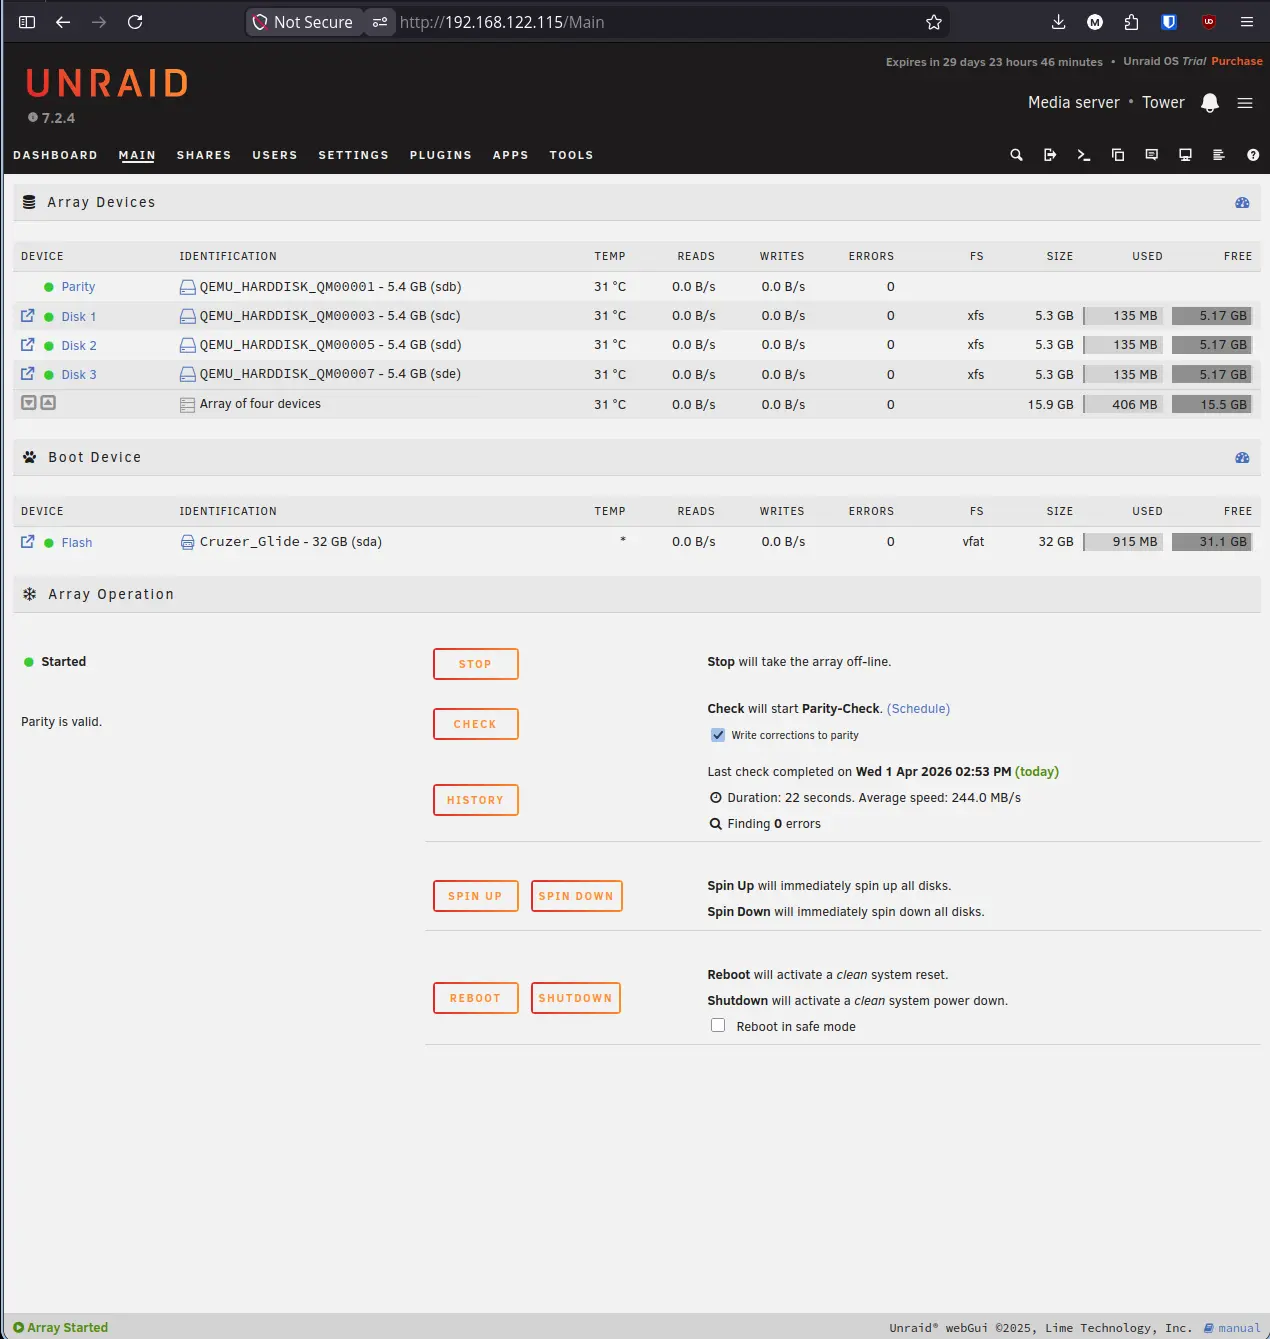
- Final Validation: Once the sync hits 100%, your array is fully protected.
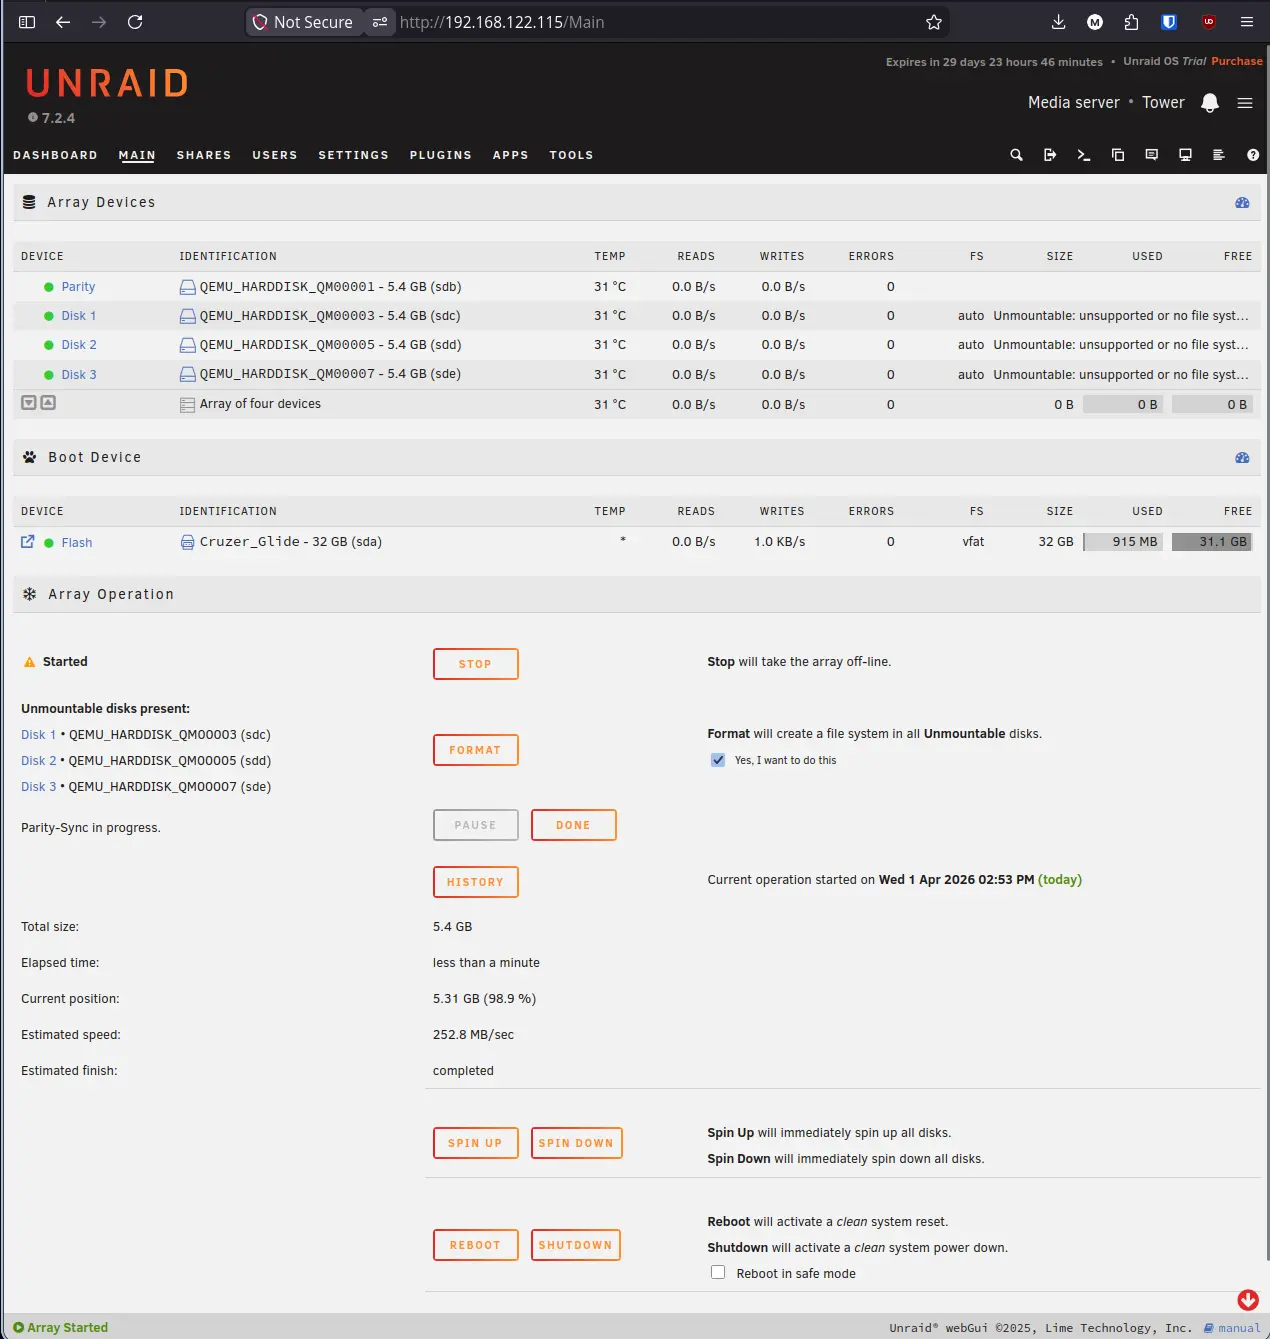
- Success Notification: A confirmation will appear in the footer once the array is healthy and the drives are mounted.
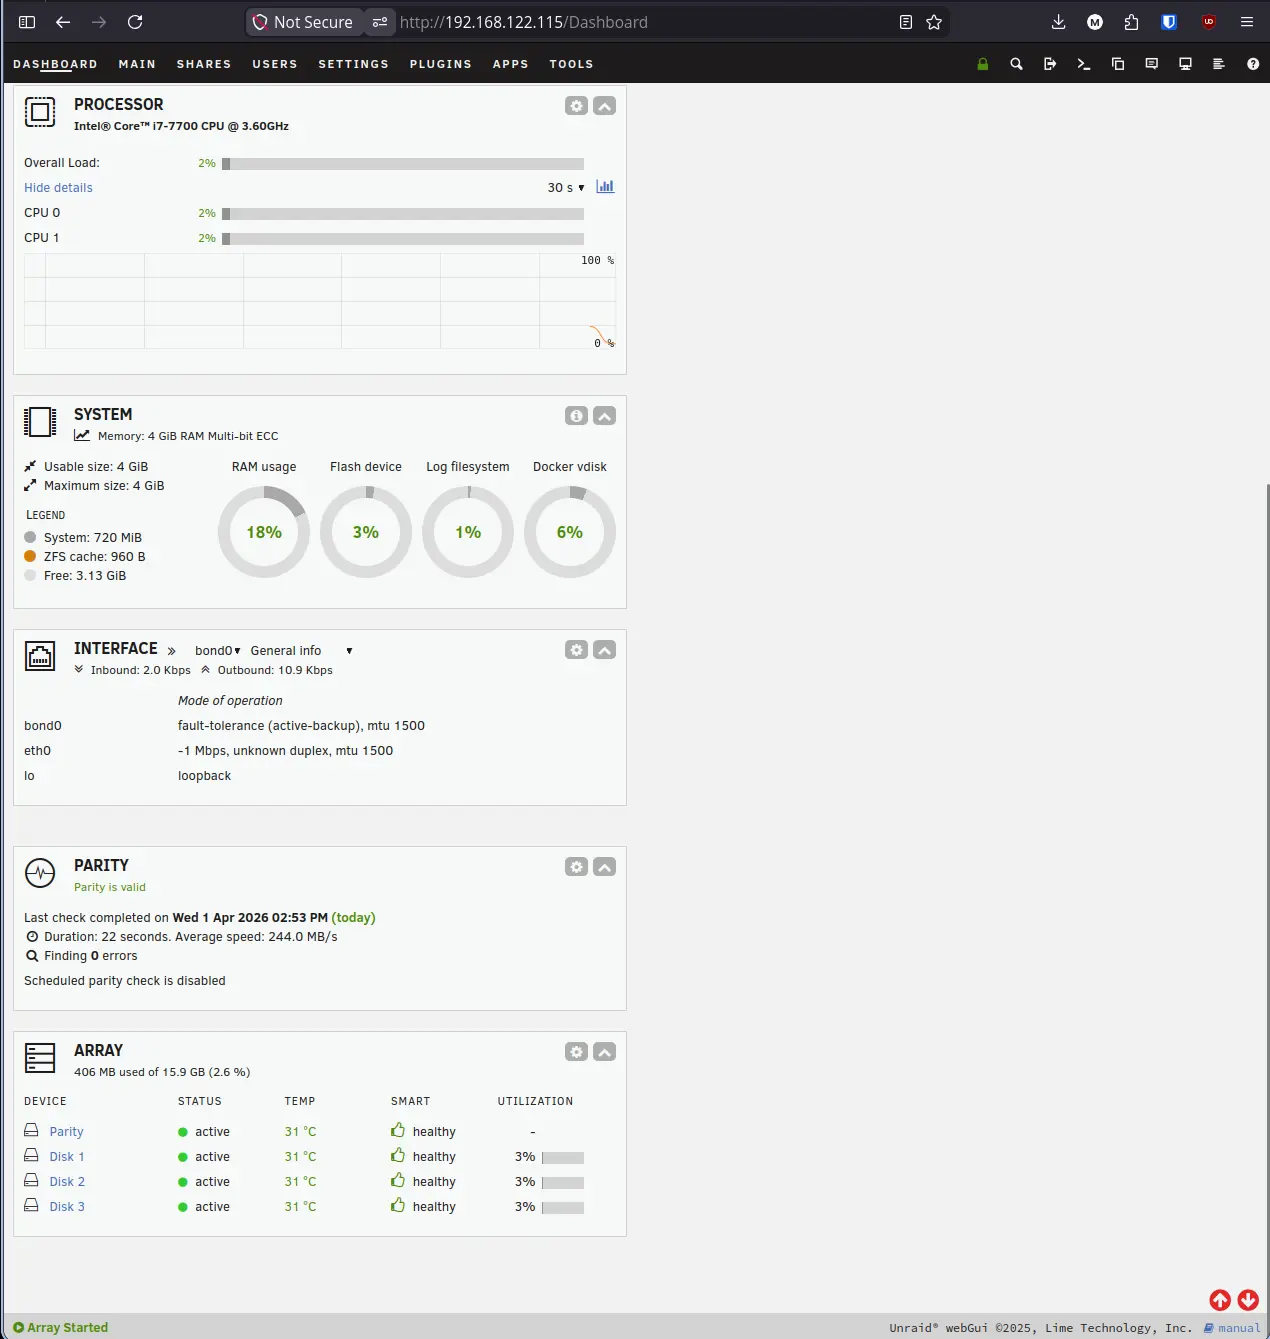
- Dashboard Overview: You can now view your overall system health and resource usage.
Lab Notes & Troubleshooting#
Web UI is unreachable at unraid.local. Use the specific IP address shown on the server’s physical monitor (e.g., 192.168.1.X) to bypass DNS resolution issues.
“Flash device error” or the system enters read-only mode. Move the USB drive to a different physical port. If the error persists, the flash drive may be failing.
“Missing OS” or “Reboot and Select proper Boot device” error on startup. Your BIOS boot mode may not match the USB. If you enabled Allow UEFI Boot in the USB Creator, make sure your BIOS is set to UEFI mode, not Legacy. Switching them to match should resolve the error.
The array is valid but the Apps tab is missing. Install the Community Applications plugin. It is the gateway to Unraid’s entire plugin and Docker template ecosystem. Navigate to Plugins in the top nav, then click Install Plugin and paste in the Community Applications URL from the Unraid Community Apps page.
The array did not start after a reboot. Confirm the auto-start setting was saved by navigating to Settings > Disk Settings and verifying Start array on boot is still set to Yes. If it reverted, re-apply and check that your flash drive is not in read-only mode.
Summary#
You have successfully transitioned from raw hardware to a functional NAS (Network Attached Storage). With the array started, auto-start enabled, and the parity sync complete, your server is providing redundant storage for your network and will come back online automatically after any reboot.
Next Step: Managing Drives and Storage Pools in Unraid